OneDrive has been in the news a lot this past week with the expansion to unlimited storage in the service for those who subscribe to Office 365. That expansion has already started with many users, including me, seeing totals of 10TB of storage available to them now. With that added storage space, now the question is how to get as much of your content into OneDrive as possible for safe keeping and for easy access, especially photos and videos.
One challenge users may encounter however is limited disk space on their PC when it comes to moving all of that data. Let me give you an example. I run Windows 8.1 Pro on my MacBook Pro (non-Bootcamp, straight up Windows baby) and I have a 256GB SSD hard disk in it. My photos and videos top out at 286GB which, simple math says, is bigger than 256GB. That means if I wanted to copy photos over I would have to do one of two things: Drag-and-drop folders of pictures onto my hard disk, wait for them to sync, then designate them as offline only. It works but it is clunky. Or two, move my OneDrive folder to an external disk. Fortunately this is pretty easy to do in Windows.
First, on your external disk, make sure you have enough room on that disk to accommodate your OneDrive content that is on your internal disk today. Second, be prepared for a wait. Depending on the amount of data you are wanting to copy over to OneDrive, this process could take days to complete. Just be prepared and plan ahead.
To start, go to Explorer and find your OneDrive folder. Right click it, go down to Properties then click on the Location tab. This is
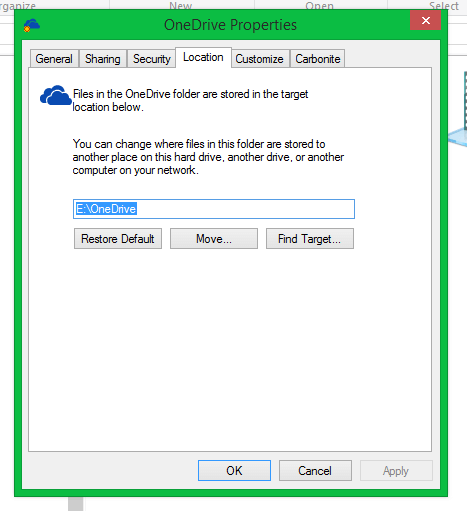
OneDrive File Location
where your OneDrive folder is stored by default which is likely C:\Users\YOURNAME\OneDrive. Just below the file location you see three buttons. Click on the Move button. Now navigate to your external disk and the location where you want your OneDrive folder to be located on it. You can point to the root of the drive or you can point it to a folder on the drive. Personally I created a folder named OneDrive just to make my life easy.
Once you have selected the new folder location and click OK, you will be asked if you want to copy the content of your OneDrive folder from its old location to the new location. Click Yes as that is somewhat the point of the exercise. Once you do then your Windows PC will begin moving those files from your hard disk to your external hard disk.
The good news here is that you don’t have to do a complete re-sync of your OneDrive data to the cloud. It is merely a behind-the-scenes change that quickly sync’s with the cloud.
Now that you have moved your OneDrive folder to an external drive, simply drag the folders or files from your photo library that you want to move to OneDrive. This can take some time (in my case it took about 45 minutes to move all 286GB of pictures and videos from their location on my external drive to a new folder in my OneDrive folder. Once you have moved them, the sync process with OneDrive in the cloud will begin.
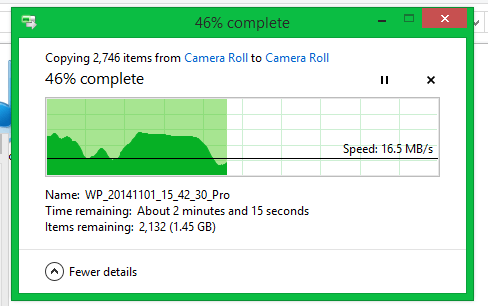
File Transfer to External
So how long does that take exactly? Well, that’s a great question because it will vary depending on how much data you have and the upload speeds from your Internet Service Provider. In my case I moved all 256GB in just over two-and-a-half days, about 60 hours. Not brilliant but equally, that’s manageable. I did my move starting on Friday morning around 6:00 AM and it completed about 6:00 PM last night on Sunday. It is hard to know for sure exactly how long it will take in each individual case so plan and prepare.
Paul Thurrott over at WinSupersite is doing a multi-part story on this moving process which you can read part one here and part two here.
Finally, for those of you who use OneDrive for Mac, you are somewhat stuck at the moment. OneDrive for Mac will not allow you to move your OneDrive folder location to an external drive – at least it couldn’t as of two weeks ago. In reviewing the release notes for the latest update to the app it doesn’t appear to have changed. If you are a Mac user and can confirm otherwise, let me know.
Be sure to check out my Windows How To’s and Windows Phone How To’s for more tips and tricks.
Can you do the same on a Mac?
So far as I am aware, yes.
Do you know if it is possible to sync to a removable device on a Mac? I haven’t been able to configure it.
No it isn’t. This How To really only applied to Win 7 and 8. Under Windows 10 it behaves much like it does on Mac. Rumor is Microsoft is going to add this functionality back to PC but I’m not sure on Mac.
Do you know how I can do this with OneDrive for Business? I have a Surface Pro and the 128 GB of internal storage doesn’t have enough space to sync my entire OneDrive for Business. I purchased a 128 GB SSD card, but the system sees it as an “external” drive and OneDrive for Business won’t sync to “external” drives; instead it requires an “internal” drive. Even though the SSD card is really internal to the Surface, it shows as “external” and therefore won’t satisfy OneDrive for Business.
Unfortunately there is no way to do this with OneDrive for Business. A lot is changing and this is expected to come to the service as Microsoft merges all of this together with OneDrive. But I’ve been hearing that for 6 months now. :\
Yes dreaming of OneDrive syncing on my SD card in my MacBook Air.
There seem to be PC workarounds including:
http://totalsurfacearea.com/how-to-sync-skydrive-to-a-removable-micro-sd-card/#comment-660
I’m too much of a neophyte to translate the drive mapping – if it can even be done.
Anyone?
It appears that my OneDrive folder doesn’t have a “Location” tab under the properties. When I go through the OneDrive tray icon to do it, my OneDrive tells me it can’t save to that location.