One of the most common questions I receive about Google’s Project Fi is if it will work with phones other than the Google Pixel and Nexus phone lineup. The short answer to this question is yes. However, there are things that you have to consider in the process and you will have to have, at some point, a compatible Pixel or Nexus phone to activate your Fi SIM. So really the answer is yes, but with a lot of hurdles to jump.
In this How To, I will go over the steps to get a non-Google phone to work with Project Fi including what you need to do to set it up, how to configure SMS/MMS and the limitations you will have with using Fi on a non-Google phone. For this article, I’m using a Nextbit Robin but the reality is that the steps outlined here should work with any phone.
A couple of warnings before I get started. First, there is no support provided getting your non-Google phone working with Project Fi. They clearly advertise it as working with their devices only as the primary SIM card (you can get the data-only card working with some iPad models and other tablets). Second, one of the big advantages of Fi is the ability to seamlessly switch between Sprint, T-Mobile and US Cellular. In a non-Google phone, you will only get T-Mobile service. If T-Mobile is not great in your area, keep that in mind.
Activating your Project Fi SIM
The first step is to make sure that you have an activated Project Fi SIM available. Currently, the only way you can activate a new SIM is with a Pixel or Nexus phone so if you are thinking of getting a Robin and Fi SIM only, it isn’t going to do the job. If you have had a Nexus device and are switching to the Robin or another phone, then your SIM should be activated and you should be good-to-go on this step.
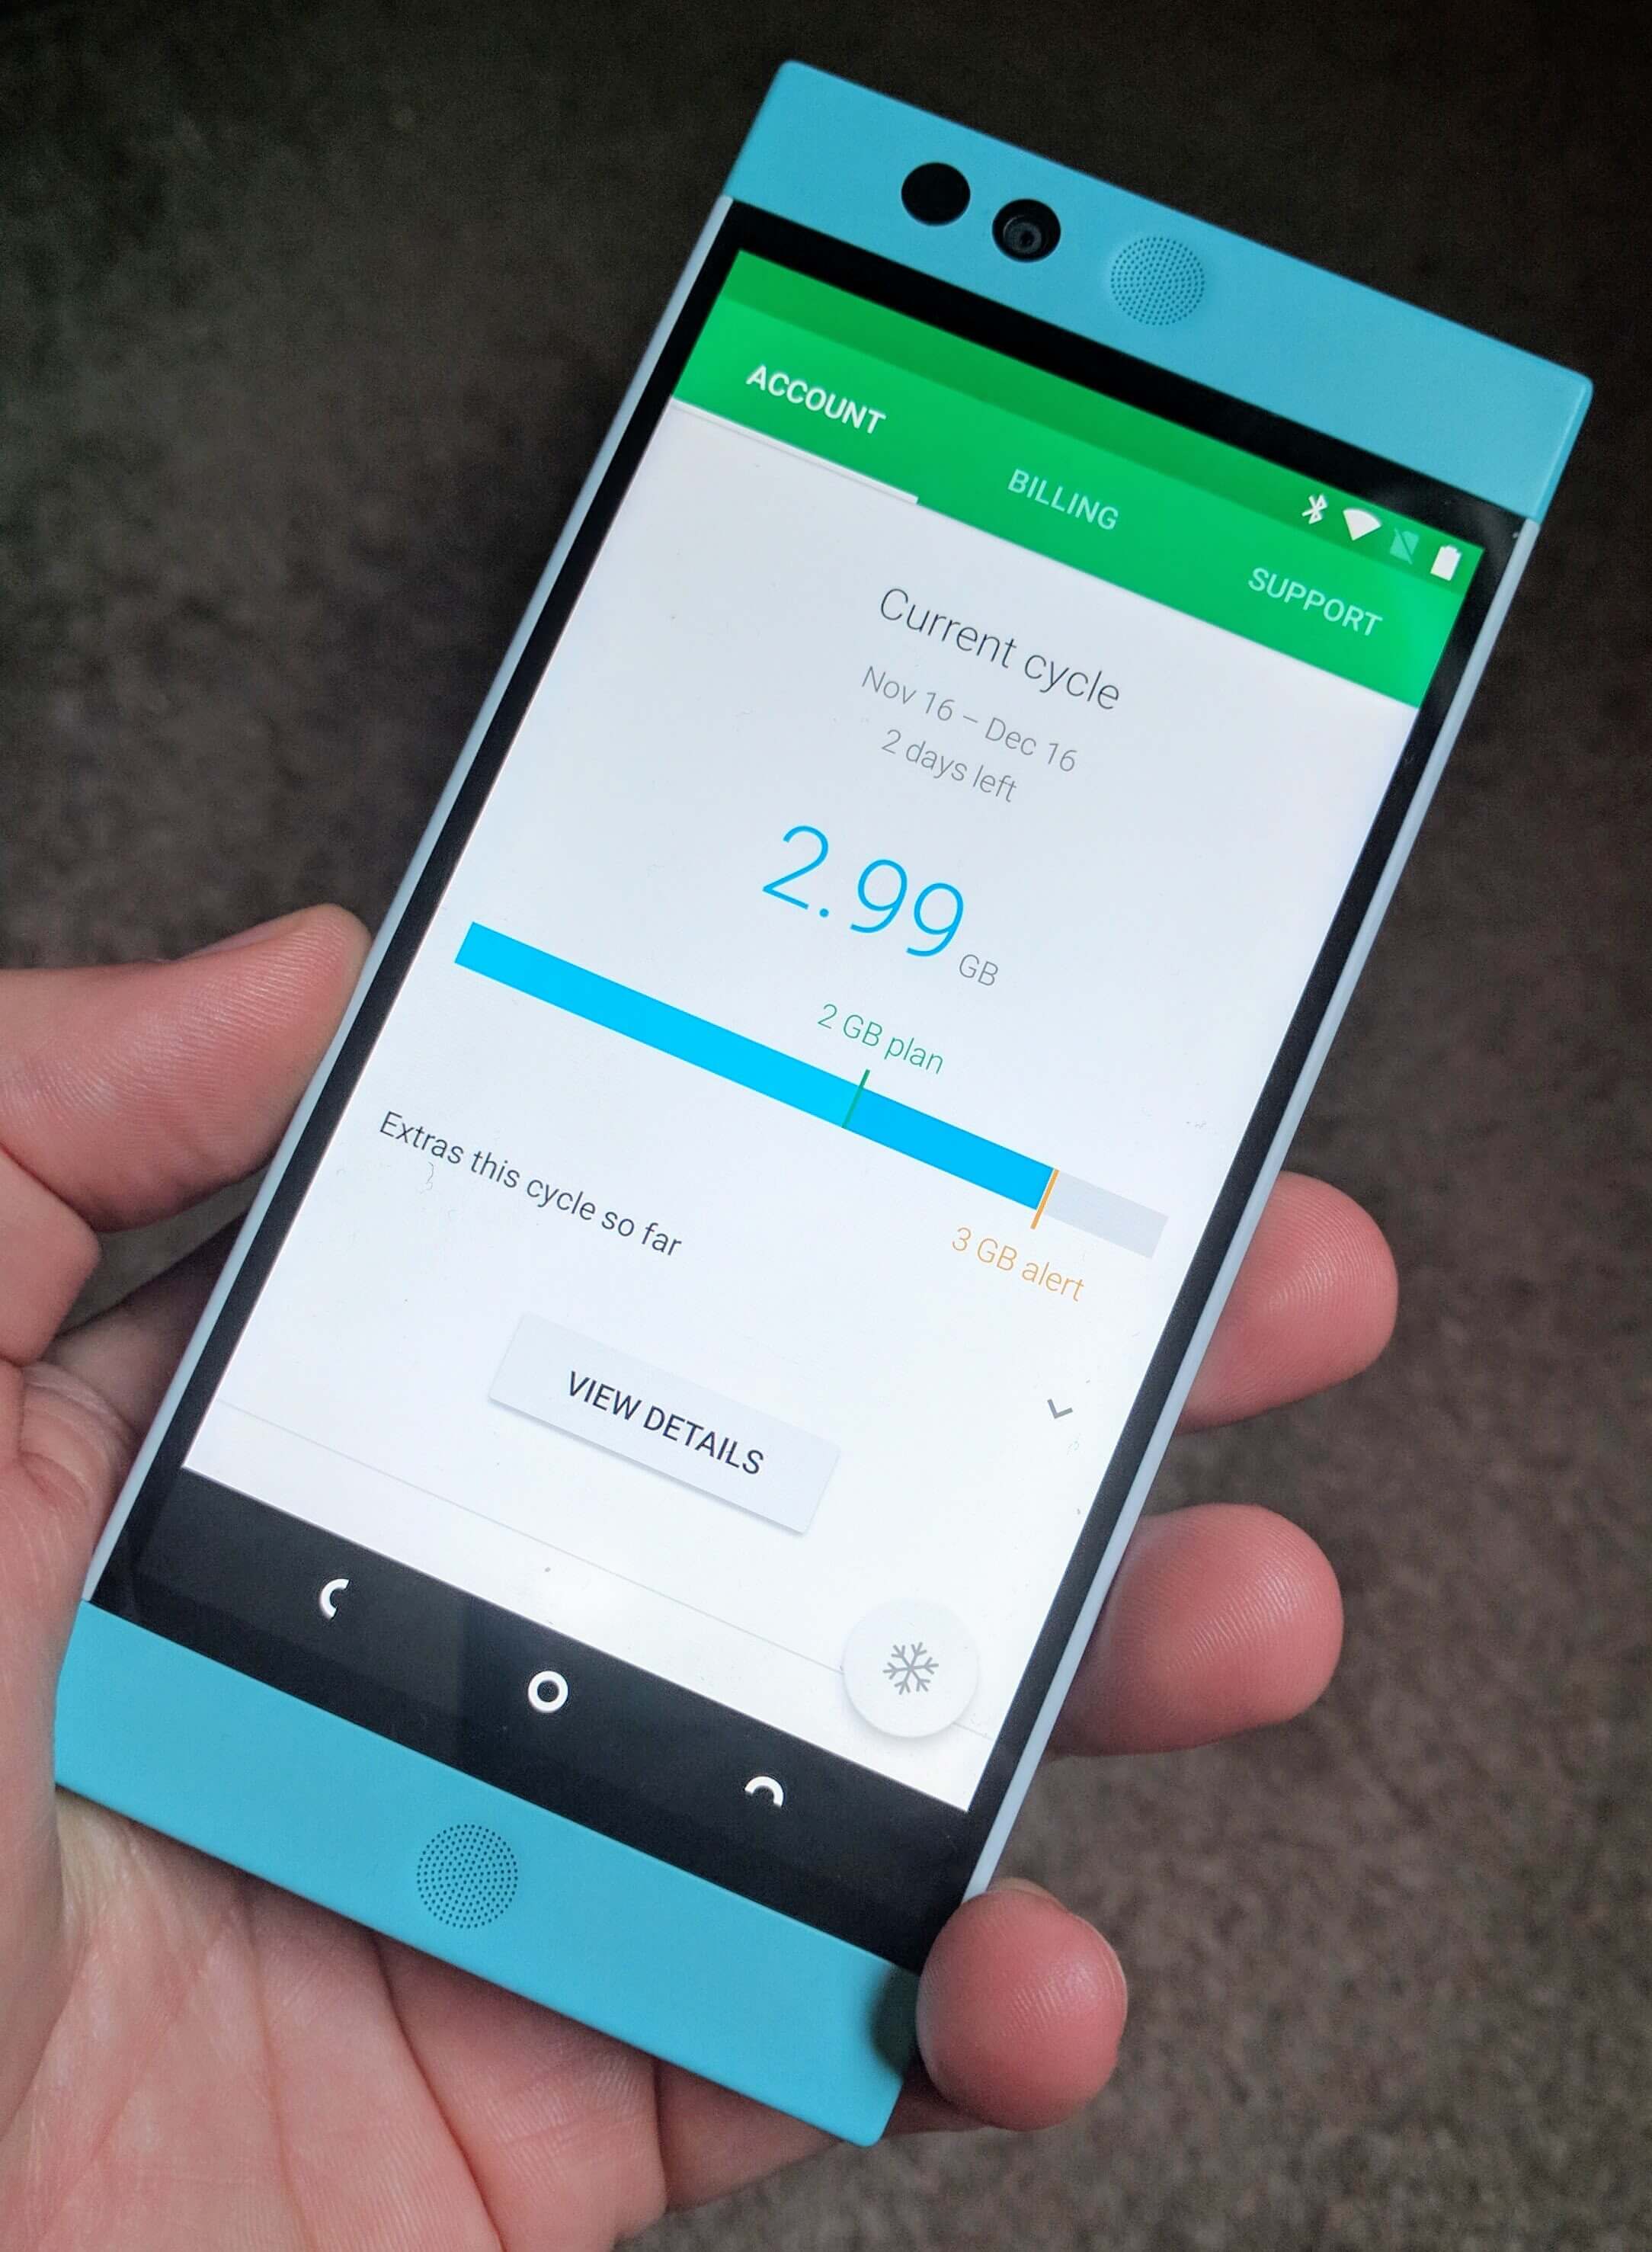
Nextbit Robin Using Project Fi
Once your SIM is activated, install it in your Robin and power up. You should immediately see a LTE connection (assuming it is in your area) and technically, at this point, you should be able to use the Fi SIM. However, other services like SMS and MMS will need configuration.
Configuring SMS/MMS
So first things first: If you want to use SMS/MMS on your Robin with Project Fi, you have to use Google Hangouts. I have tried multiple SMS/MMS apps and never, ever have been able to get any of them to work. It seems, outside of a Pixel or Nexus, you have to use Hangouts. That’s not necessarily a bad thing and, in fact, most Fi users do use Hangouts for SMS. But if you like another app, be warned, I and many others have not been able to get them to work.
In order to make sure you get SMS/MMS on the Robin, you will need to create an APN. This is done by going to Settings>More>Cellular network settings>Access Point Names. You will then need to create a new APN with the following settings. Where you see
- Name: Project Fi
- APN: h2g2
- Proxy:
- Port:
- Username:
- Password:
- Server:
- MMSC: http://mmsc1.g-mms.com/mms/wapenc
- MMS Proxy:
- MMS Port:
- MCC: 310
- MNC: 260
- Authentication type:
- APN type:
- APN protocol: IPv4
- APN Roaming protocol: IPv4
- Bearer: Unspecified
- APN PPP phone number: Not set
- MVNO type: IMSI
- MVNO value: 31026097
It is likely that you will see auto-created APNs when you insert your Project Fi SIM into your Robin. After you create the new one outlined above, you can delete those.
Now that you have the network setup, you need to do a bit of work inside of Hangouts. First, make sure it is set as your default SMS application. You can do this by going to Settings>SMS and tap the SMS enabled section to make Hangouts your default SMS app. Next, arrow back in Settings and go down to Account and tap it. About halfway down the page you will see Project Fi calls and SMS –
Install The Project Fi App – Or Maybe Not
If you like the voicemail transcription provided by Project Fi then you need to install the Project Fi app to get this working properly. If you don’t use this feature, you do not have to install the app but it may be nice nevertheless so you can easily keep track of your data usage on your Robin. Regardless of what you may have read or heard, the Fi app will install on your Robin. In fact, it will install on any Android phone but it is kind of pointless without Fi enabled on it.
Conclusion
That’s it folks. If you follow these steps, you should be able to get your Project Fi SIM working in your Nextbit Robin or any other Android Phone. Have fun, good luck and let me know how it goes!
Be sure to check out all of the How To’s I have here on the site for more tips and tricks on Android and Chrome OS.
Awesome, already have Fi on a Nexus 5X and just got a robin (it is my name after all and SO much better than the Nexus). I put the Fi SIM in before I read this and took off walking down the street away from my WiFi, then made a phone call – it all worked great. Now I will apply the APN advice here. Thanks!!
Hmm, actually, after I put the Project Fi SIM in, I am not able to see APN settings. I’ll see if I get Hangouts texts or not. Maybe I need to set up the APN before adding the SIM card?
Robin, try to create the APN before putting the SIM in the phone.
Thanks, I will try that, but honestly everything seems to be working great, Hangouts texts included. This phone is SO much better for me than the Nexus 5X. Runs faster, more responsive, etc. Happy New Year!