Wireless networks in homes have, for the majority of users, been fraught with challenges. Whether the challenge is a cryptic network name or an even more cryptic password, configuring a home Wi-Fi access point can be flat out painful at times. Even for those of us who have been working in telecom and have configured routers, switching and access points, there is something that is just makes doing it at home with consumer equipment a real challenge. Google recognized this and last Fall introduced the Google OnHub, a home wireless access point that makes configuration and setup simple. Not opting for a low-end branded device, Google worked closely with TP-Link to produce a stunningly impressive Wi-Fi access point that is easy and dare I say painless to setup.
I recently bought a Google OnHub, replacing my Apple Airport Extreme which was flaking out after only two years of service, and I have to say that I’ve been nothing short of impressed. Sure it doesn’t have some of the sophisticated knob-turning of similarly price access points but it does have one of the fastest, smoothest setups I have ever seen. From the time I unboxed it to the time I was online was literally less than 5 minutes. And even if you are not an Android user, you can easily set up the app-driven OnHub from your iPhone.
If you are looking for a simple to setup and manage Wi-Fi network for your home (or even small business), take a look at the Google OnHub. Here is my review.
Google OnHub Lineup and Specifications
I will start with the technical bits first and give you the highlights of the TP-Link OnHub that I purchased. Currently there are two OnHub devices available from Google: The TP-Link unit and the newer Asus built unit. Both, from a technical perspective, support the same antenna array and software but there are a few minor differences. For this review I’m only going to focus on the unit I have and my experience setting it up and using it.
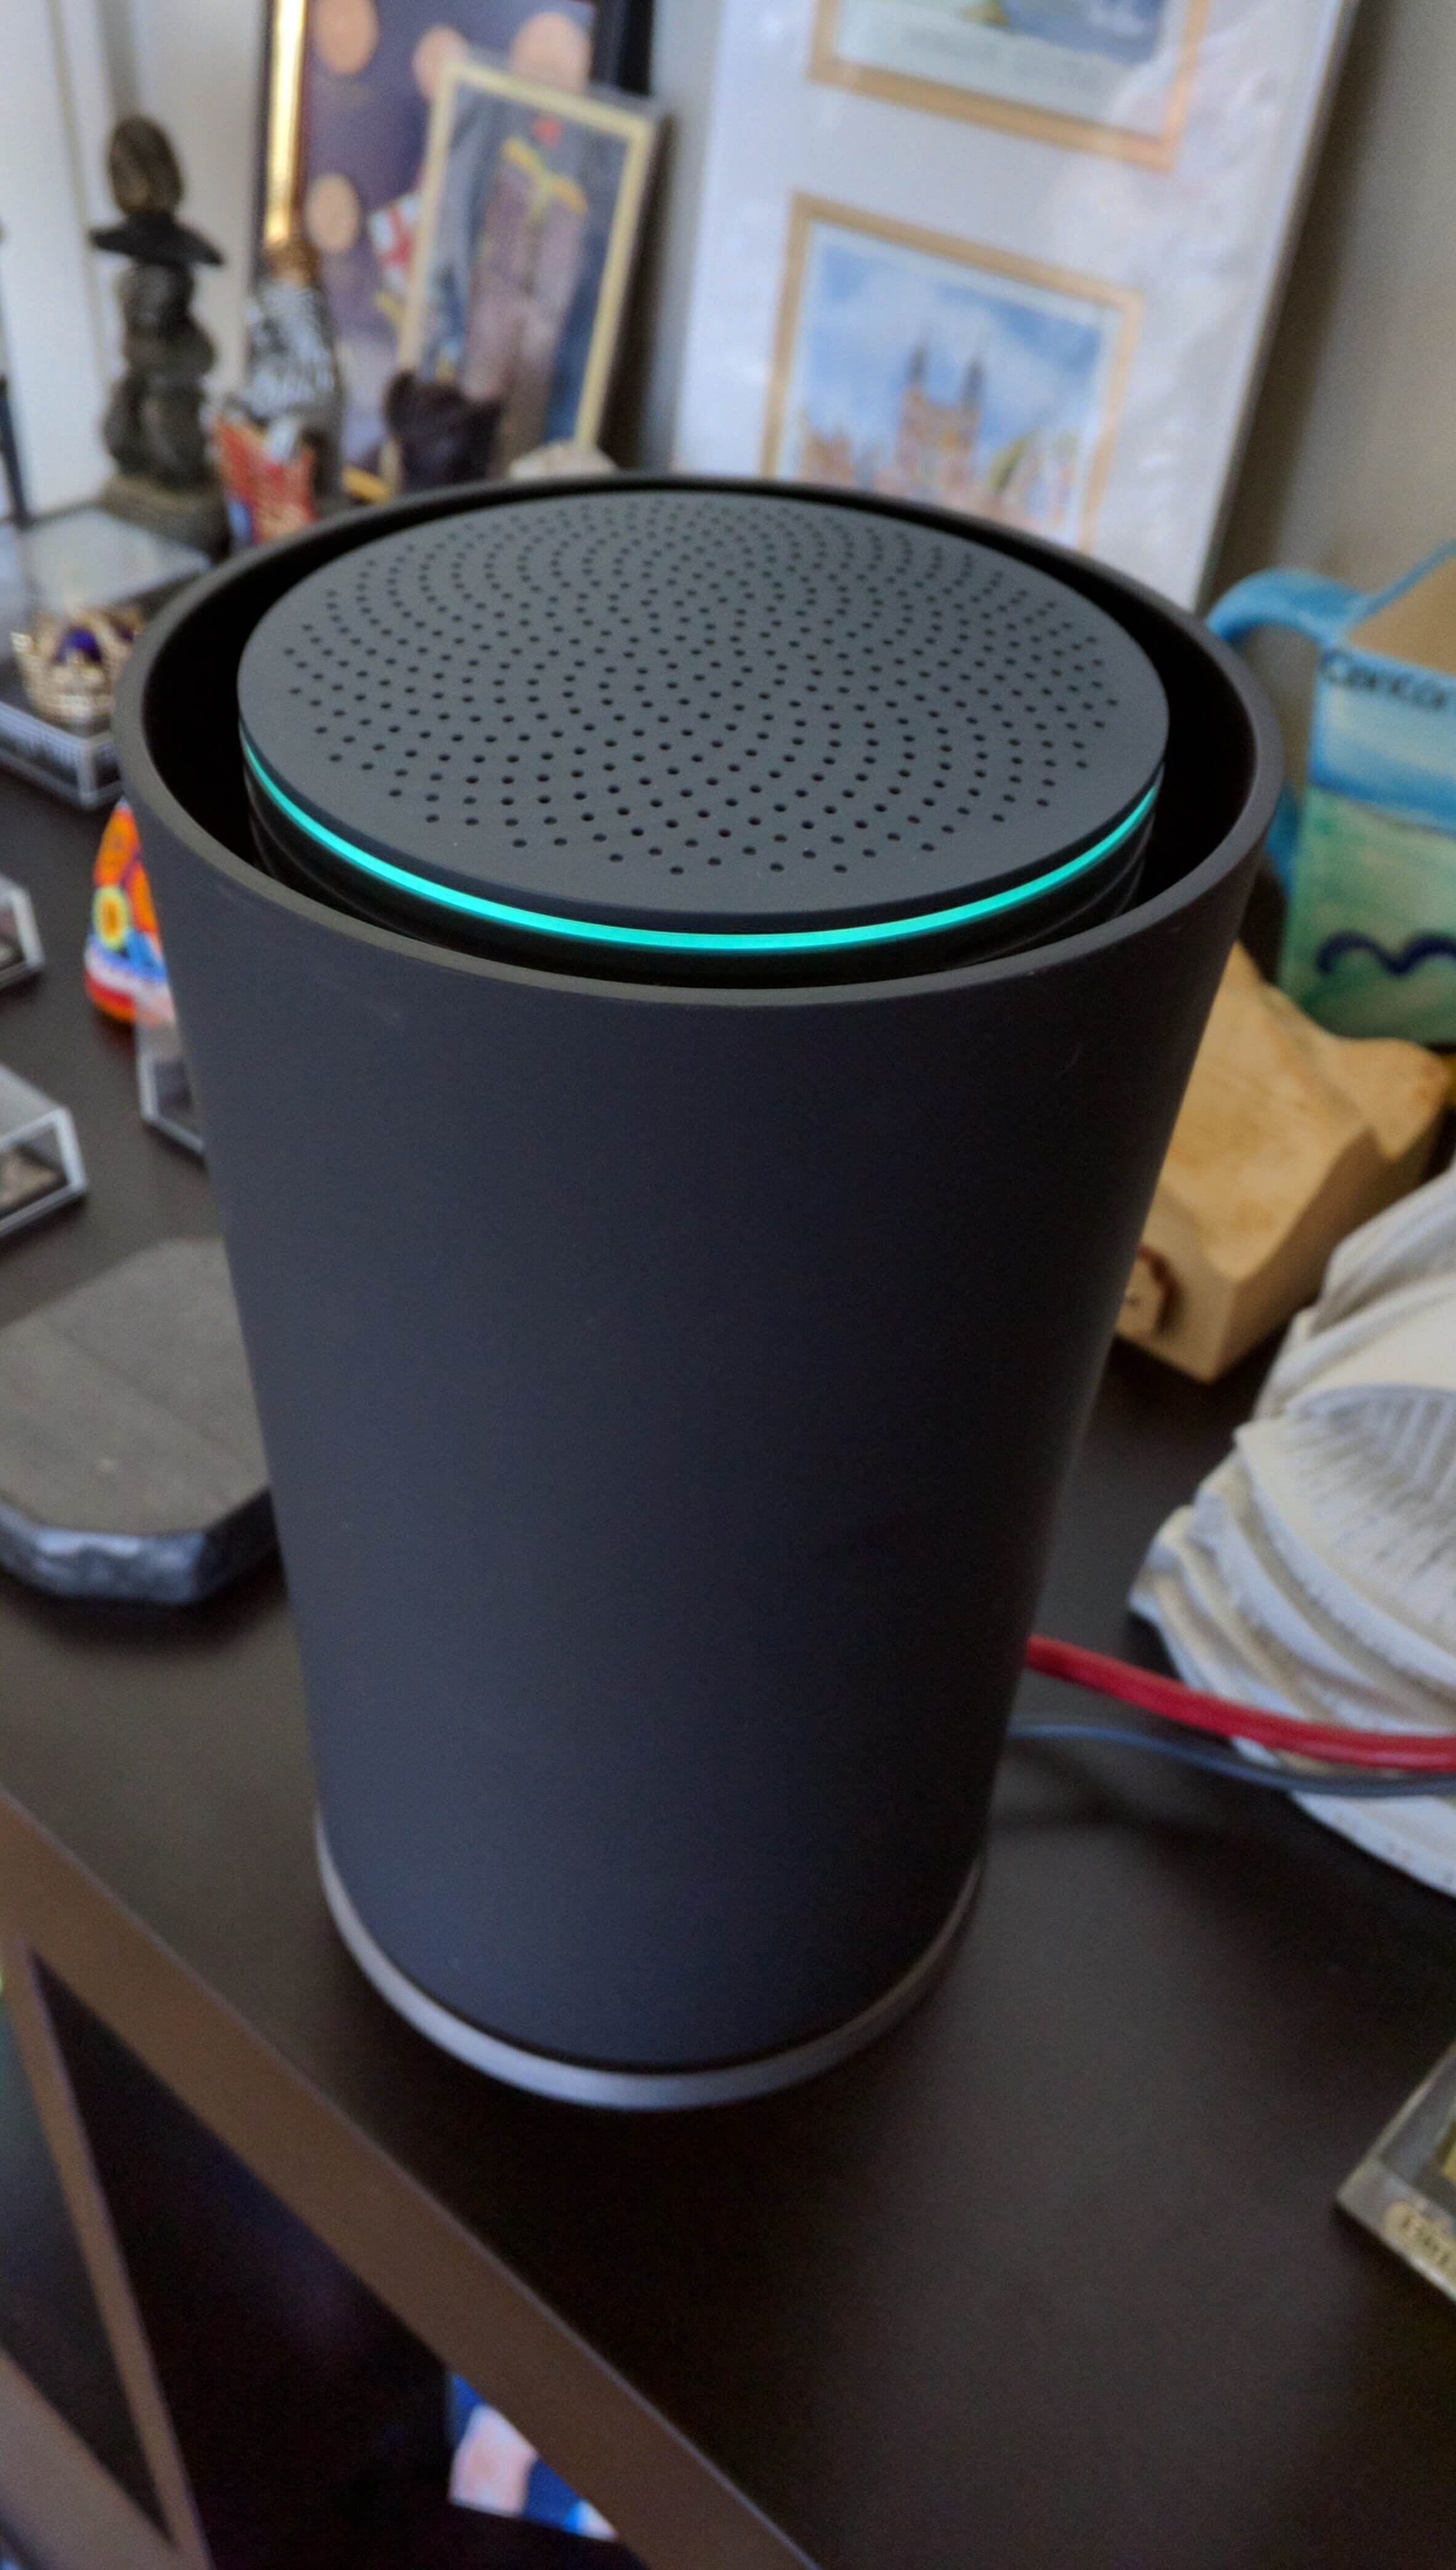
Physically the OnHub is a column-shaped device that measures 4.5″ x 7.5″ x 4.0″ and weighs in at 1.9 lbs. In new money that 115 x 190 x 105 mm and .86 kg. It is available with an outer blue or
Google OnHub
black shell and Google purposely designed this Wi-Fi AP be out in the room. It doesn’t look like a piece of Star Trek gear sitting on your shelf, or worse, in a closed cabinet. Google wanted you to not necessarily have it as a center piece, but not necessarily be ashamed of the techie gadget either. I think they did a good job overall. It looks nice and unless you know what it is, you could easily mistake it for a vase.
Powering the OnHub is a dual-core Qualcomm IPQ8064 with 1GB of RAM and each core running at up to 1.4 GHz and that horsepower for a Wi-Fi access point is important because of the massive antenna array in the device. There is also 4GB of storage built into the unit, giving plenty of room for future updates to this device. There are a total of 13 antennas in it that supports 802.11a/b/g/n/ac for wireless connectivity, a Bluetooth antenna and a Zigbee antenna. If you haven’t heard of Zigbee, you probably aren’t alone. Zigbee is an IEEE 802.15.4-based specification for a suite of high-level communication protocols used to create personal area networks with small, low-power digital radios according to Wikipedia. Think of it as the next generation of Bluetooth but the device is also Bluetooth Smart (LE) ready. There is an awful lot of traffic going on inside of the OnHub and Google worked with TP-Link to make it future proof as well. It is 802.15.4 ready and it is also Weave ready. Weave, in case you don’t know, is a communication platform for IoT (Internet of Things) that Google is developing.
The antenna array is one of the strong suits of the OnHub and really makes the performance outstanding. First, it broadcasts on 2.4 GHz and 5 GHz simultaneously. There are no separate networks for the two frequencies so which ever your device can access, it will use and that gives a big performance boost. Secondly, leveraging the software of the OnHub, the antennas have the ability to sense Wi-Fi frequency congestion and will dynamically change channels as needed for better performance. These two features combined with the antenna array gives an amazingly stable and fast Wi-Fi experience with this device, even if you live in a radio frequency congested area. I’ll cover this in more detail later on in the review.
At the top of the OnHub you will find a speaker as well as an LED ring that indicates the status of the device: Amber is bad, Teal is good. I’ll go into a bit more detail on this when I cover setting
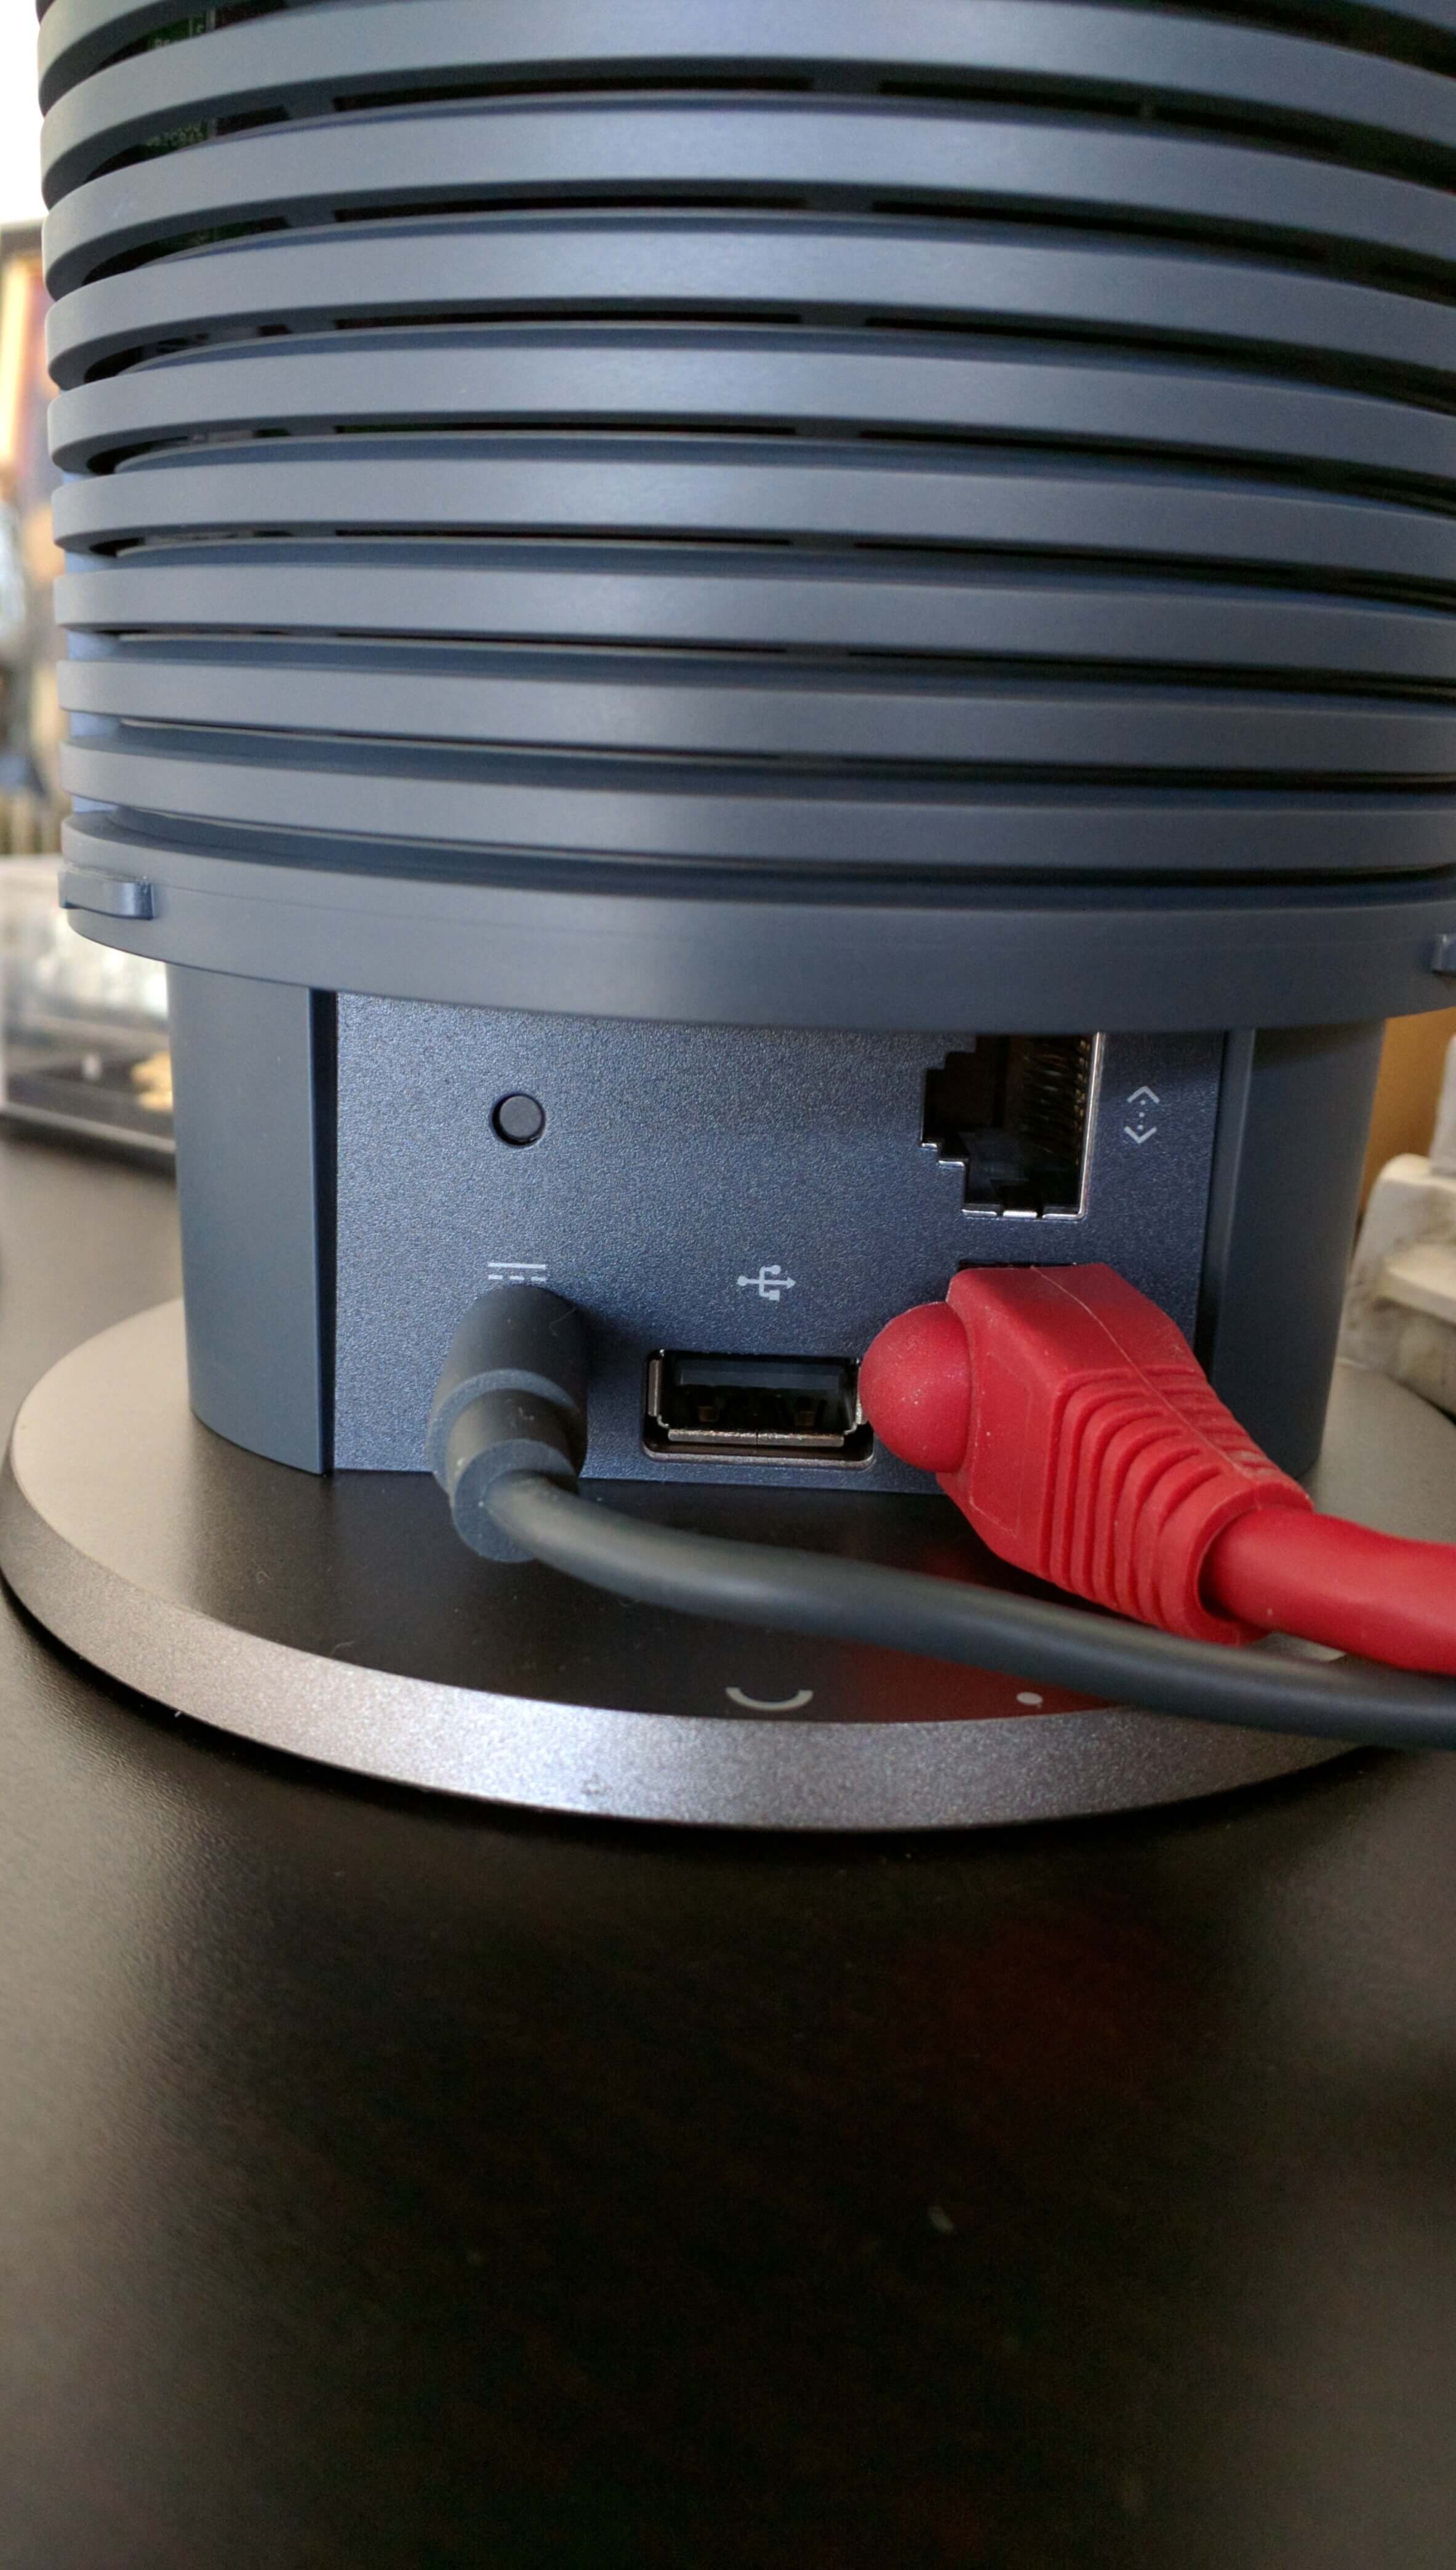
Google OnHub Network Connections
up the device for the first time. If you pull the cover off of the device, you will find the Gigabit Ethernet ports, one for WAN (connecting to your ISP router) and one for LAN (connecting a device or a switch). There is also a USB 3.0 connector this brings me to my first complaint about the device. At a $200 price point, most Wi-Fi access points are going to come with 3 or 4 LAN ports and frankly, most people paying this amount of money would expect it to have more than one. I think it is a valid argument to a point. If you are connecting up wireless devices like PCs, mobile phones and tablets, this is really a moot point. But for many who have security cameras or other things that require a port, one simply isn’t enough. Although Google positions the OnHub as getting rid of the cables, it’s not really realistic for most. If you have things that absolutely require a LAN port, you are likely going to have to get yourself a small switch to plug into the LAN port to give you more. Which again, kind of defeats what Google is going after on the device.
My other complaint is that the USB 3.0 port is not enabled at this time. Why Google? Why? This would be an absolutely perfect way to have a network storage array in your home but for whatever reason, Google hasn’t enabled this yet. In the OnHub product groups there have been a lot of complaints about this and I’m hoping that the OnHub team is hearing it and we will see it enabled soon. It seems like a no brainer and being able to add network storage configuration functions into the OnHub app would be easy to do.
Google OnHub Setup
Setting up the OnHub is quick and completely driven from the OnHub app from your Android or iOS device. The app is free and is required to setup, make configuration changes and so forth.
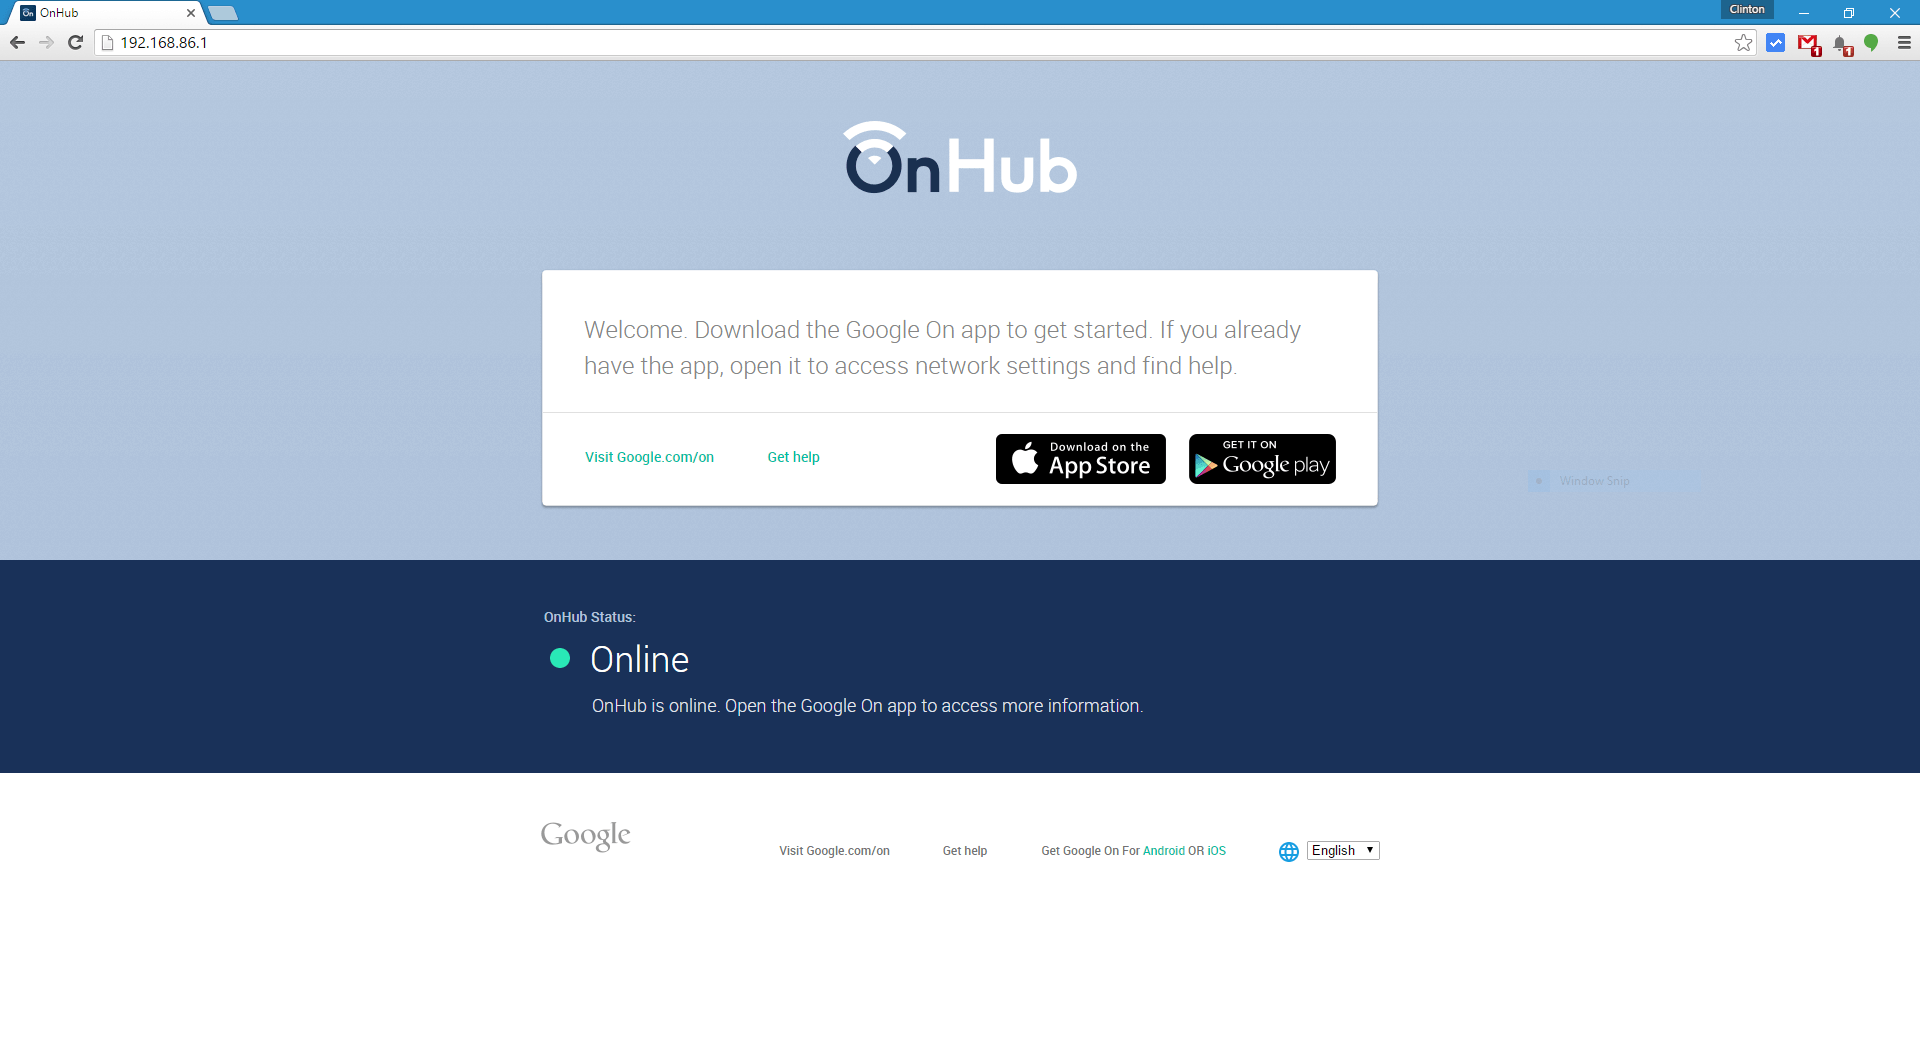
Google OnHub Web Page
Most access points you can go to a web page to get to the settings but not on an OnHub. If you navigate to the IP address you will simply see a page that tells you to download the app. Some will not like this but frankly I found the app easy to use during the setup so I didn’t mind it.
Google states that the ideal location for the OnHub is in a place that is central in your house for maximum coverage. That’s a nice notion but the reality is that most users have their ISP connection in one room, often in the corner of their house. If you live in a very large home (5,000+ square feet), this could be problematic but for most homes, you will be okay but this is a bit of an unknown. In my case, I live in a 1,000 square foot apartment and because of the glass, steel and concrete construction of my building, I had challenges with my Apple Airport Extreme, especially on my balcony which has triple-pane glass between it and the Extreme. Therefore I had to put an Airport Express near my balcony to get coverage out there. With the OnHub, I’ve had absolutely no problem getting solid Wi-Fi connection while out on my balcony. Again, your mileage will vary but you can connect more than one OnHub to your network if needed to bridge them.
To start, plug one of the provided Ethernet cables to the WAN port on the back of the OnHub and connect it to your ISP router via its Ethernet port. Next, plug the power in and let the OnHub boot up and you will then see the accent light at the top turn blue and pulse. This is your indication that it is ready to be setup. Now start the app on your phone and tap the setup button to begin the process. The app will automatically find the OnHub device and you will be prompted to hold your phone over the top of the device until you hear an audible tone that tells you the app and device are not connected and configuration is happening. You will then be prompted to name your wireless network and to setup a password for it. Once this is done, the accent like on the OnHub will turn a solid teal. You are done with the configuration and should have Wi-Fi access to the network immediately.
A couple of observations about the setup process. First, while the audio confirmation and setup is cool (well, geeky more like it), it is a bit of overkill and seems like an awful lot of effort by Google to create a simple setup. While tear downs of the OnHub have not found a microphone, the thought process by most is that Google could turn this into an Amazon Echo-like device.
Second, there are going to be some power users out there that will not like the over simplistic setup approach and configuration process. If you like to tweak with settings and really massage your network, this is not the device for you nor did Google really intend it for you. The OnHub has only a handful of open ports (53, 80, 443 and 5000) so you are not going to have a lot of knobs to turn. If you are not into that sort of thing, which most of us are not, then this access point is perfect really. It is simple to setup and get going straight away without having to remember IP address and other settings.
The Google OnHub App
The app that you use to setup, configure and access your OnHub device is straightforward and easy to use but equally, it provides a good amount of information about the device, devices connected
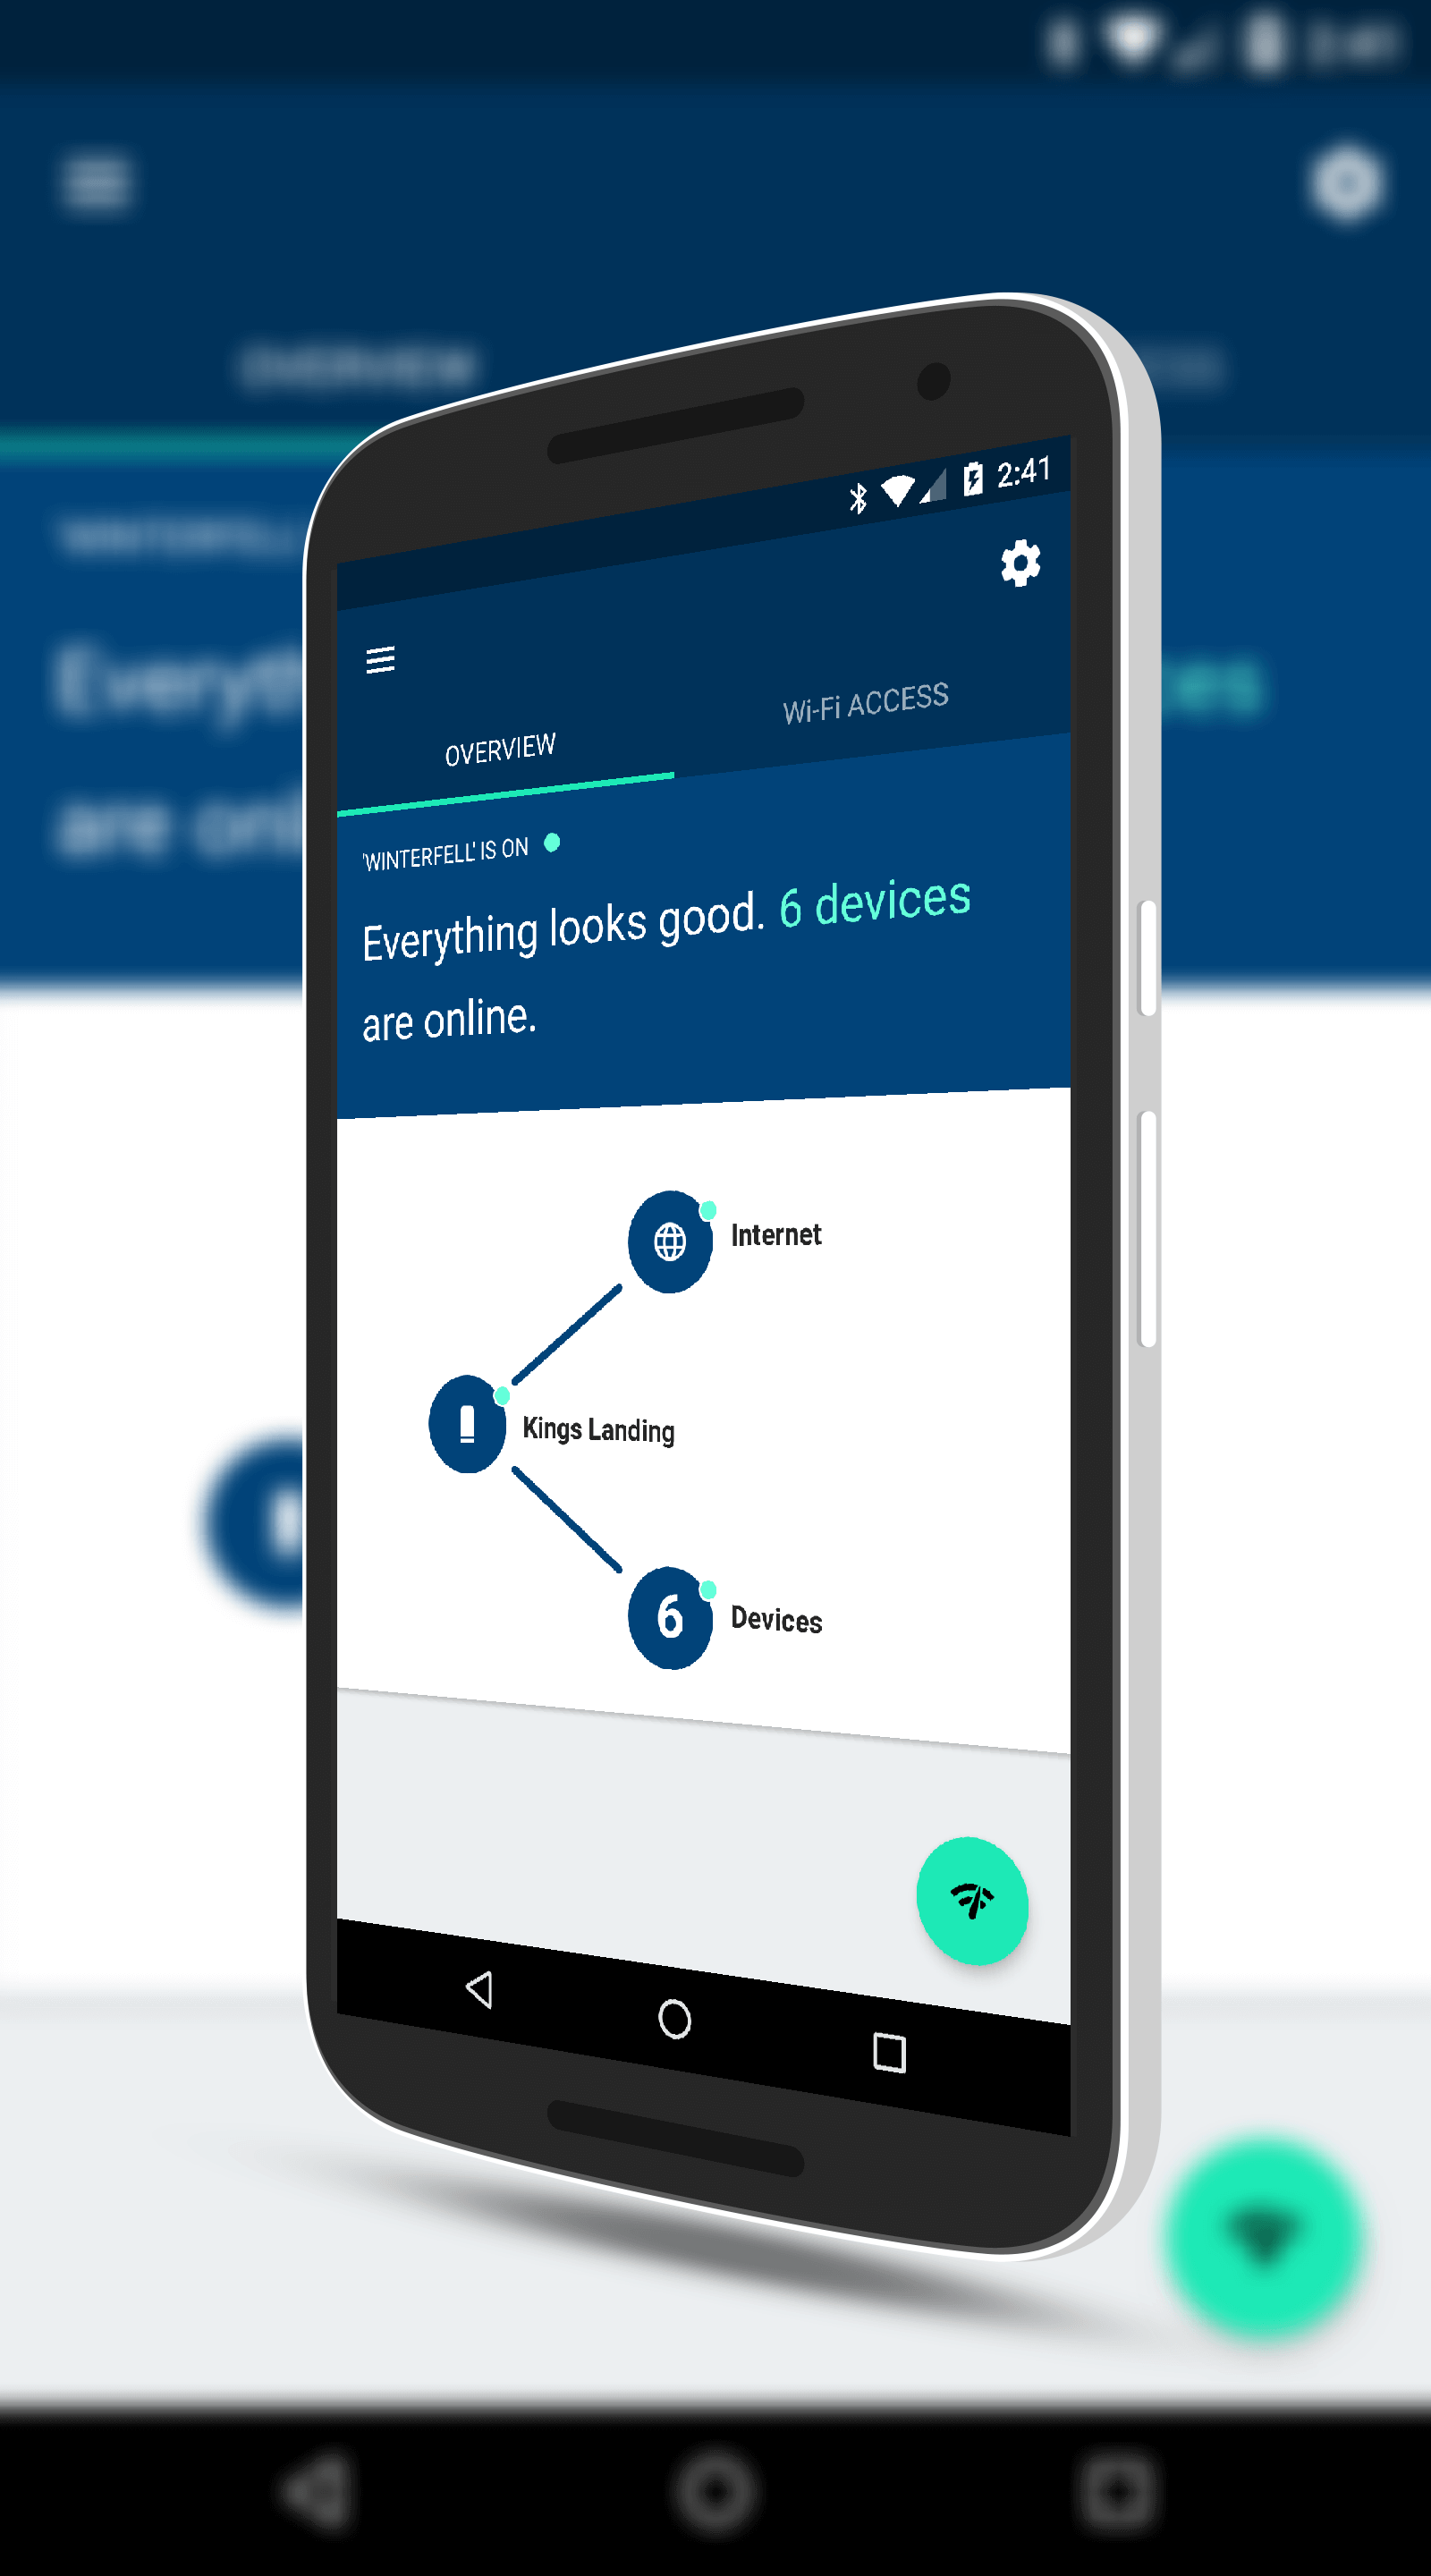
Google OnHub App Overview
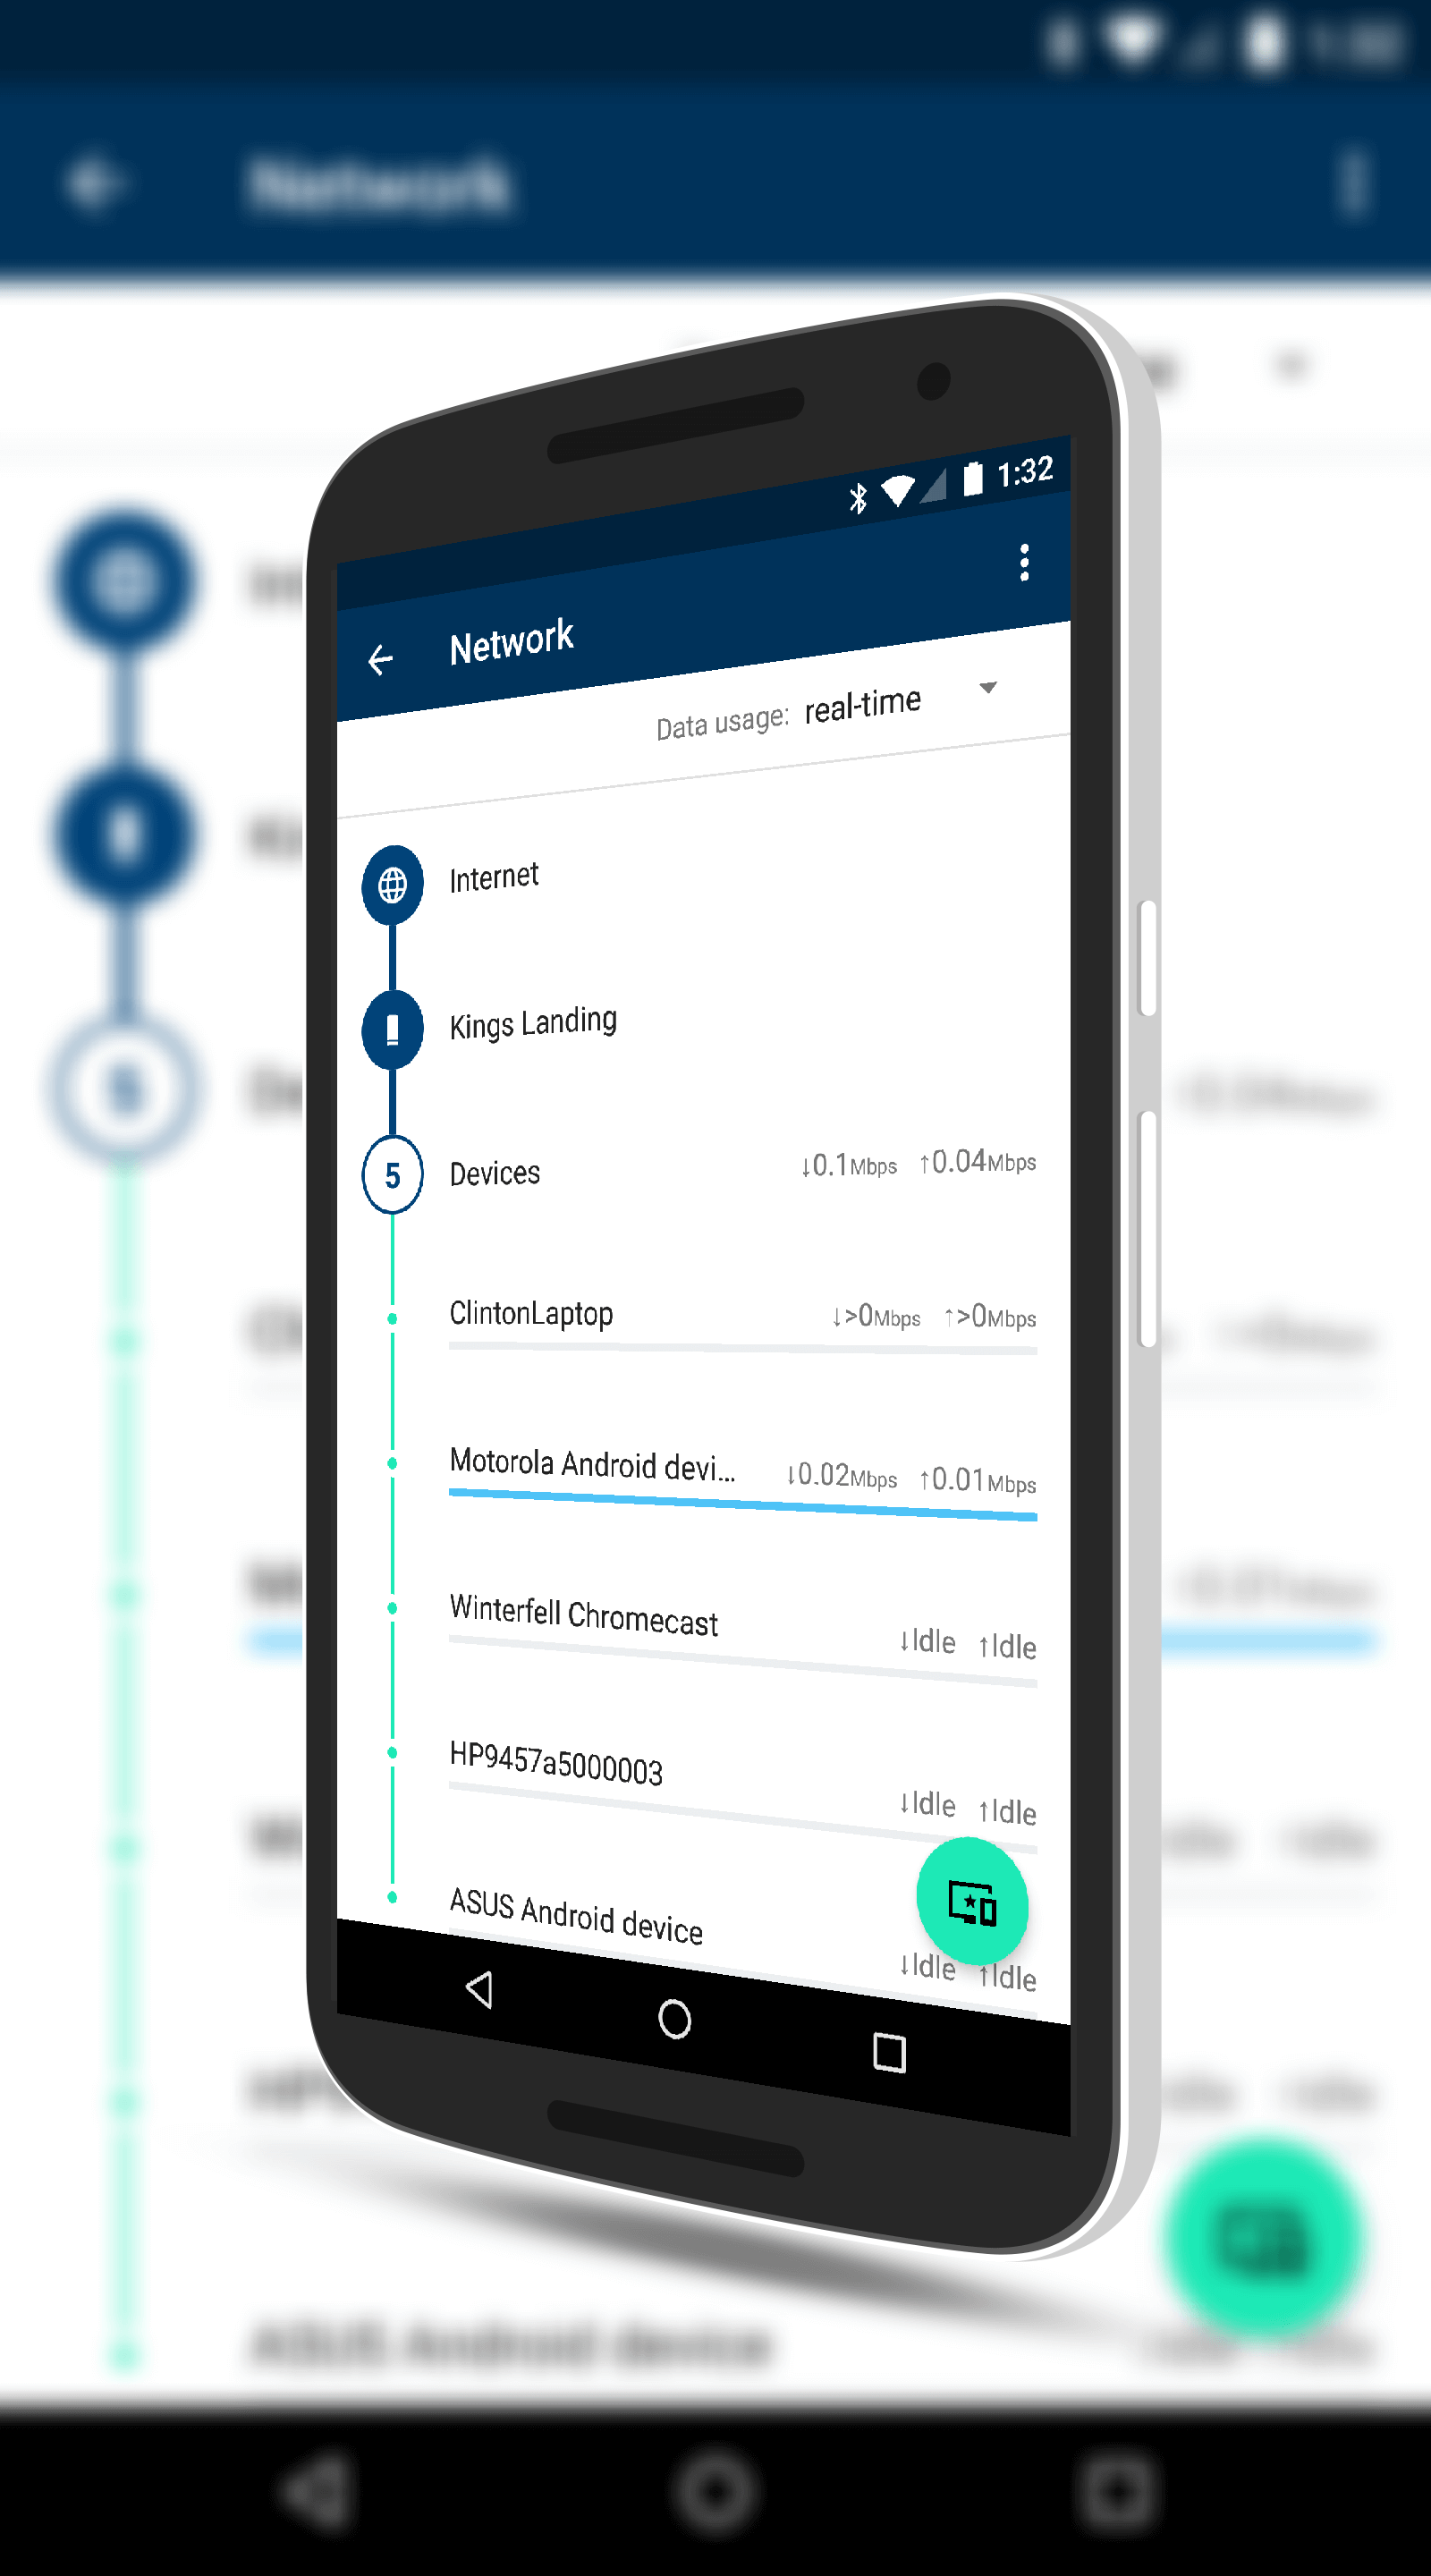
to your network and even gives you the ability to prioritize traffic to one device over another. When you first start the app after configuration, you will see the start page of the app which shows your connection to the Internet, your OnHub and the devices connected to your network in a simple network diagram on the Overview tab. The Wi-Fi Access tab tells you your wireless network name and from here you can share the password of your network for those who have come over to visit. The password can be copied to a clipboard which makes it easy to share via SMS or the like but ideally you will just want to show them the password in the app.
If there is a problem with anything on your network, you will get a notification at the top of the page along with the number of connected devices. Tap on that number of devices and you will be taken to a screen that allows you to see all the devices by their network name. Here you will be able to see in real time how much network consumption a particular device is using and you can even seen that over the course of an hour, over 7 days or over 30 days by pulling the menu down next to Data Usage. Tapping on a specific device will give you the connection status, IP and MAC address of that device.
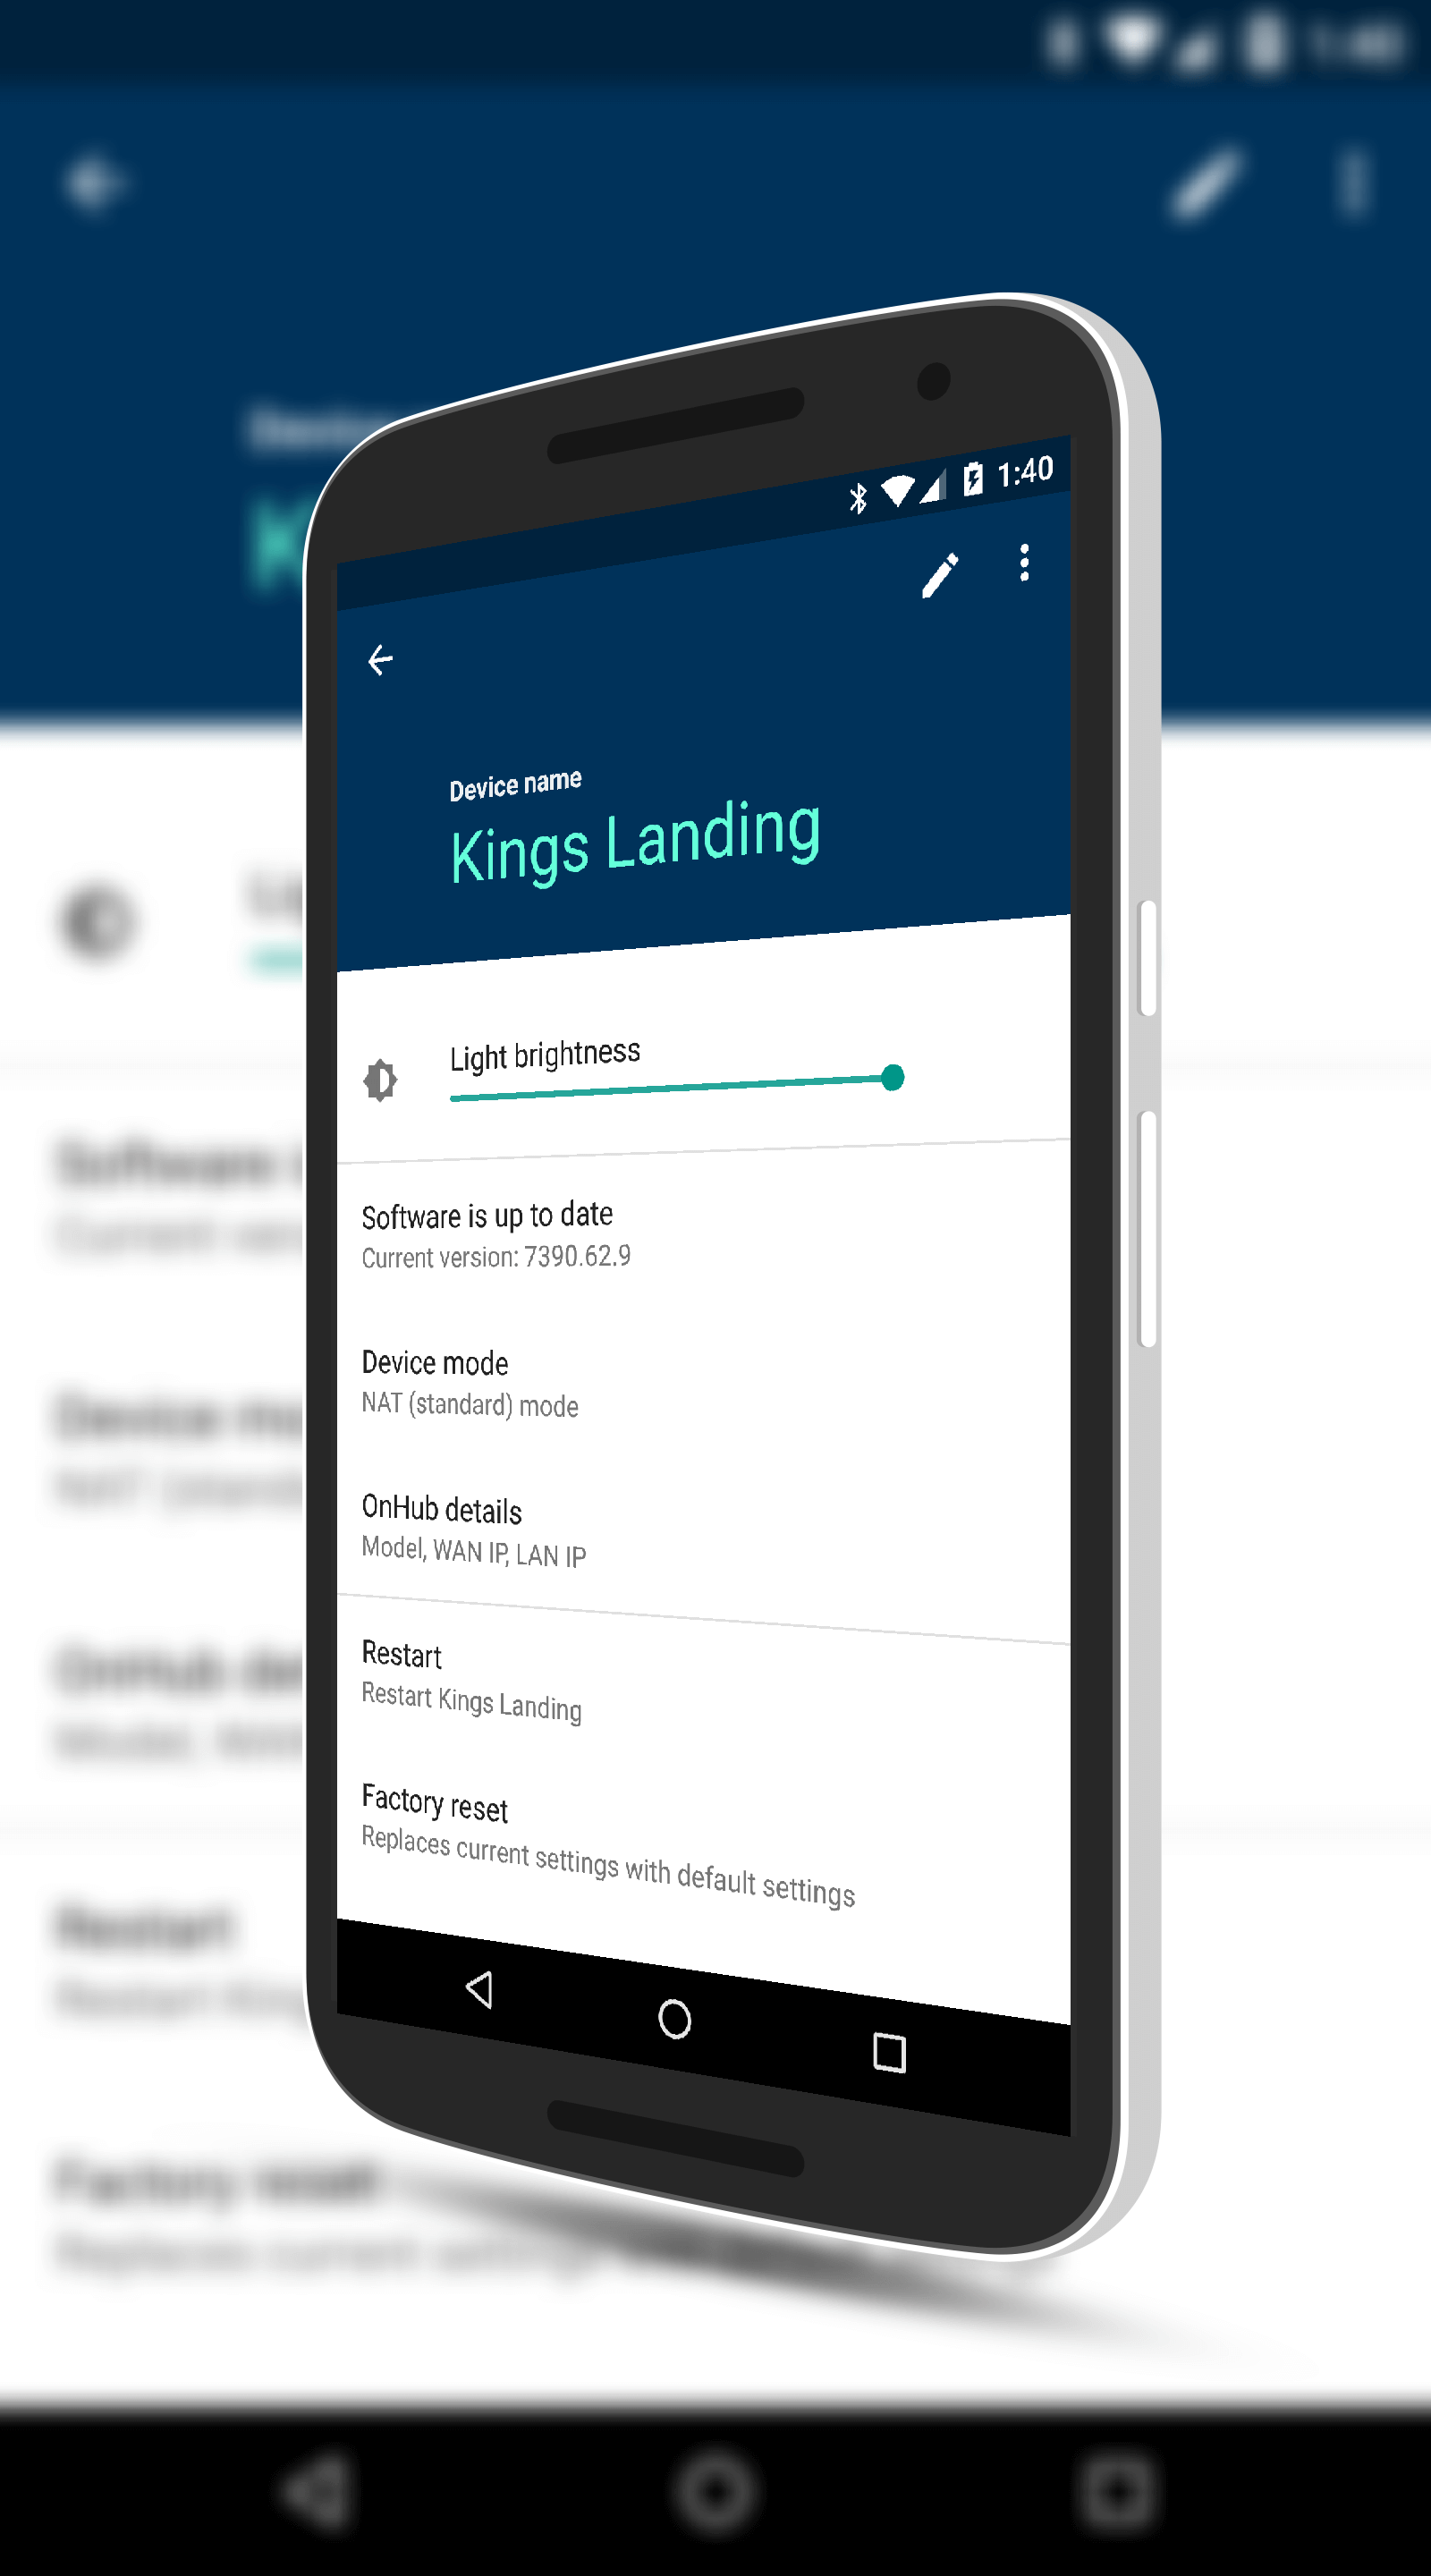
Back on the Overview tab, you will see an gear icon to go into the overall settings of not only the app but for your OnHub access point itself. Here you can edit things like your network name and password, adjust the more advanced network settings like DNS and WAN (your Internet) connection. For power users, again, you will not find a lot of knobs to turn. You can adjust the OnHub hardware itself by changing the name of your device. You will note in the screenshots that my OnHub is named Kings
Google OnHub Device Listing
Google OnHub Hardware Settings
Landing and my network name is Winterfell so no, not a fan of Game of Thrones at all, but thanks for asking. 🙂 You can also adjust the brightness of the ambient light, see the mode you have the device in (NAT or Bridge), your IP address for your WAN and LAN as well as being able to restart or reset your OnHub.
Inside the app you will also find a simple network throughput testing tool which you can access from the Overview page using the network icon in the lower right corner. When you tap this, the OnHub app conducts a network test by first testing your download throughput and then your upload throughput. Once that is complete, it measures the connectivity of your phone to the network and gives you a rating of how efficient your device is in accessing the network. 100% is obviously the best on this last part as that would indicate your phone is able to take full advantage of the bandwidth that is available.
In using the network testing tool I never found the results of my device to my network less than 100%. I did however note that the actual throughput that the app showed was vastly different than what I would find in the Ookla SpeedTest.net app. A good example can be found in the screenshots to the left where I show the results from the OnHub app and next to it, the ones from SpeedTest.net. These were done within a minute of each other on the device and you will see a 19 Mbps difference on the download an a 1 Mbps difference on the upload. Having two apps like this measure +/- 1 Mbps is something I can live with because I can account for it with network traffic on my LAN. 20 Mbps? Not so much. I think the bottom line on this part of the app is that it isn’t hugely accurate but it does give you a quick snapshot of what speeds look like on your network without having to fumble through your phone to find another app. If you really want to know the speeds you have going on your network, I suggest a more accurate app like the SpeedTest app.
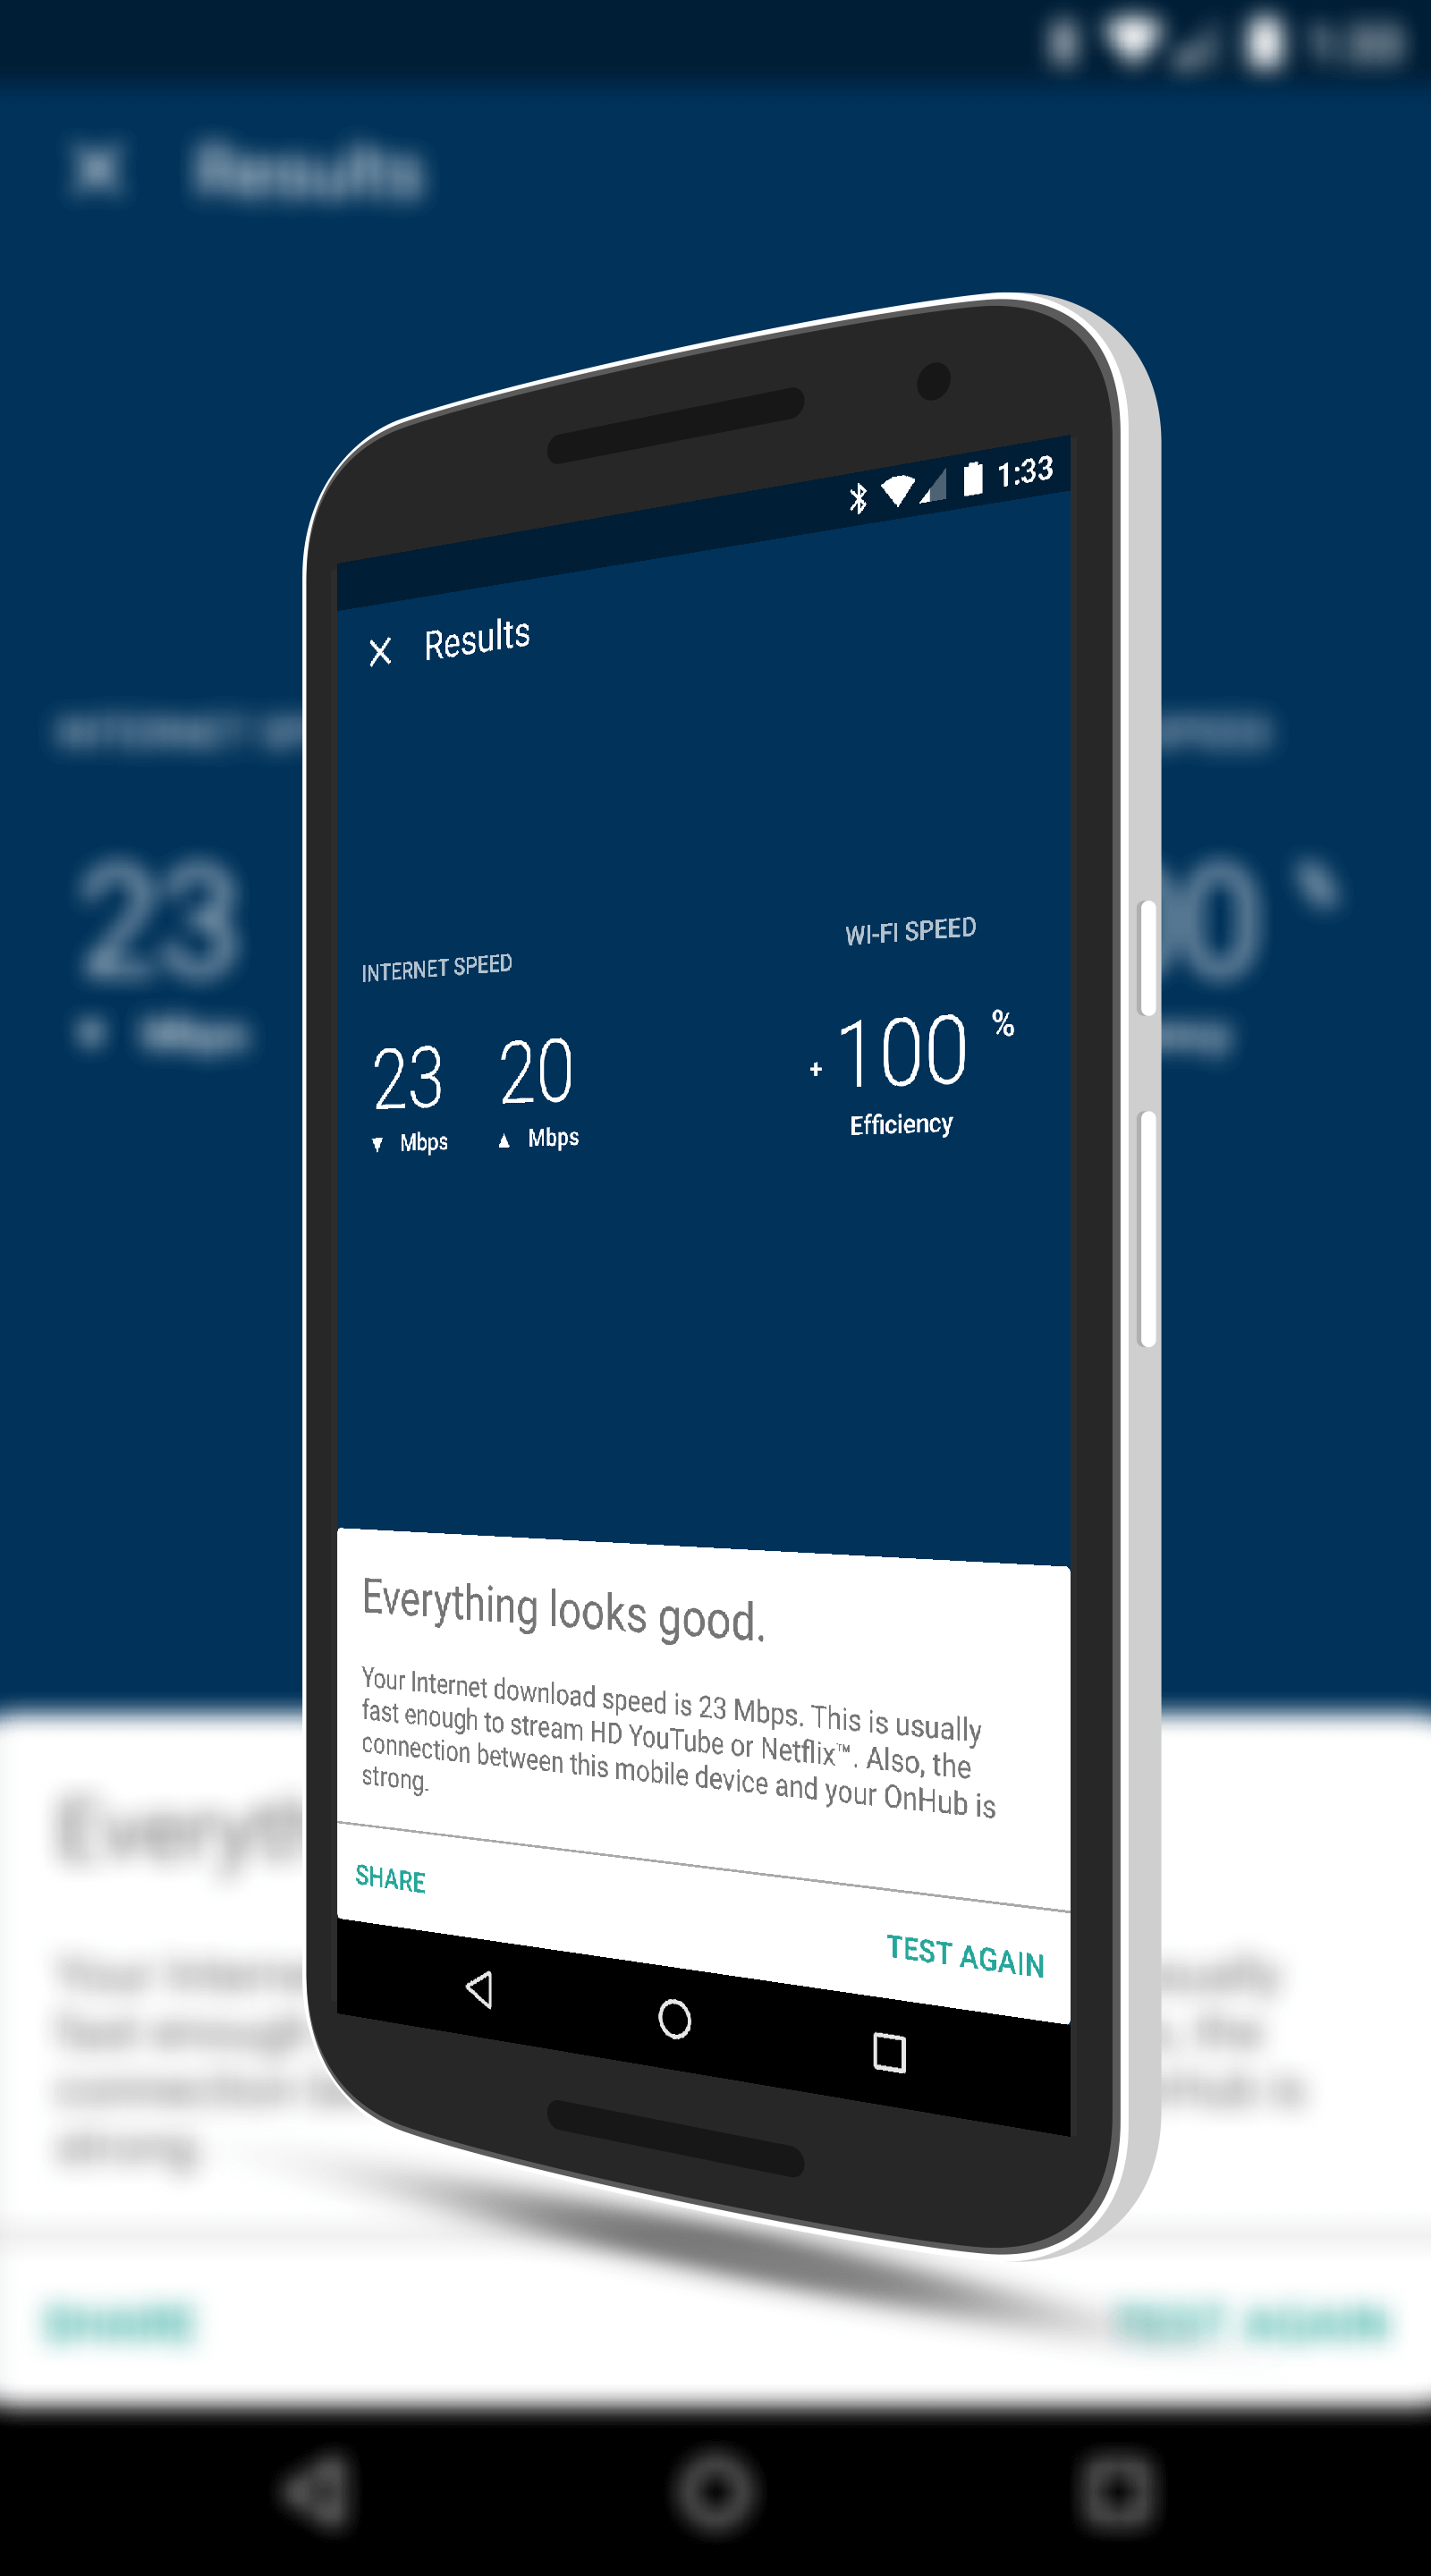
Google OnHub Network Test Results
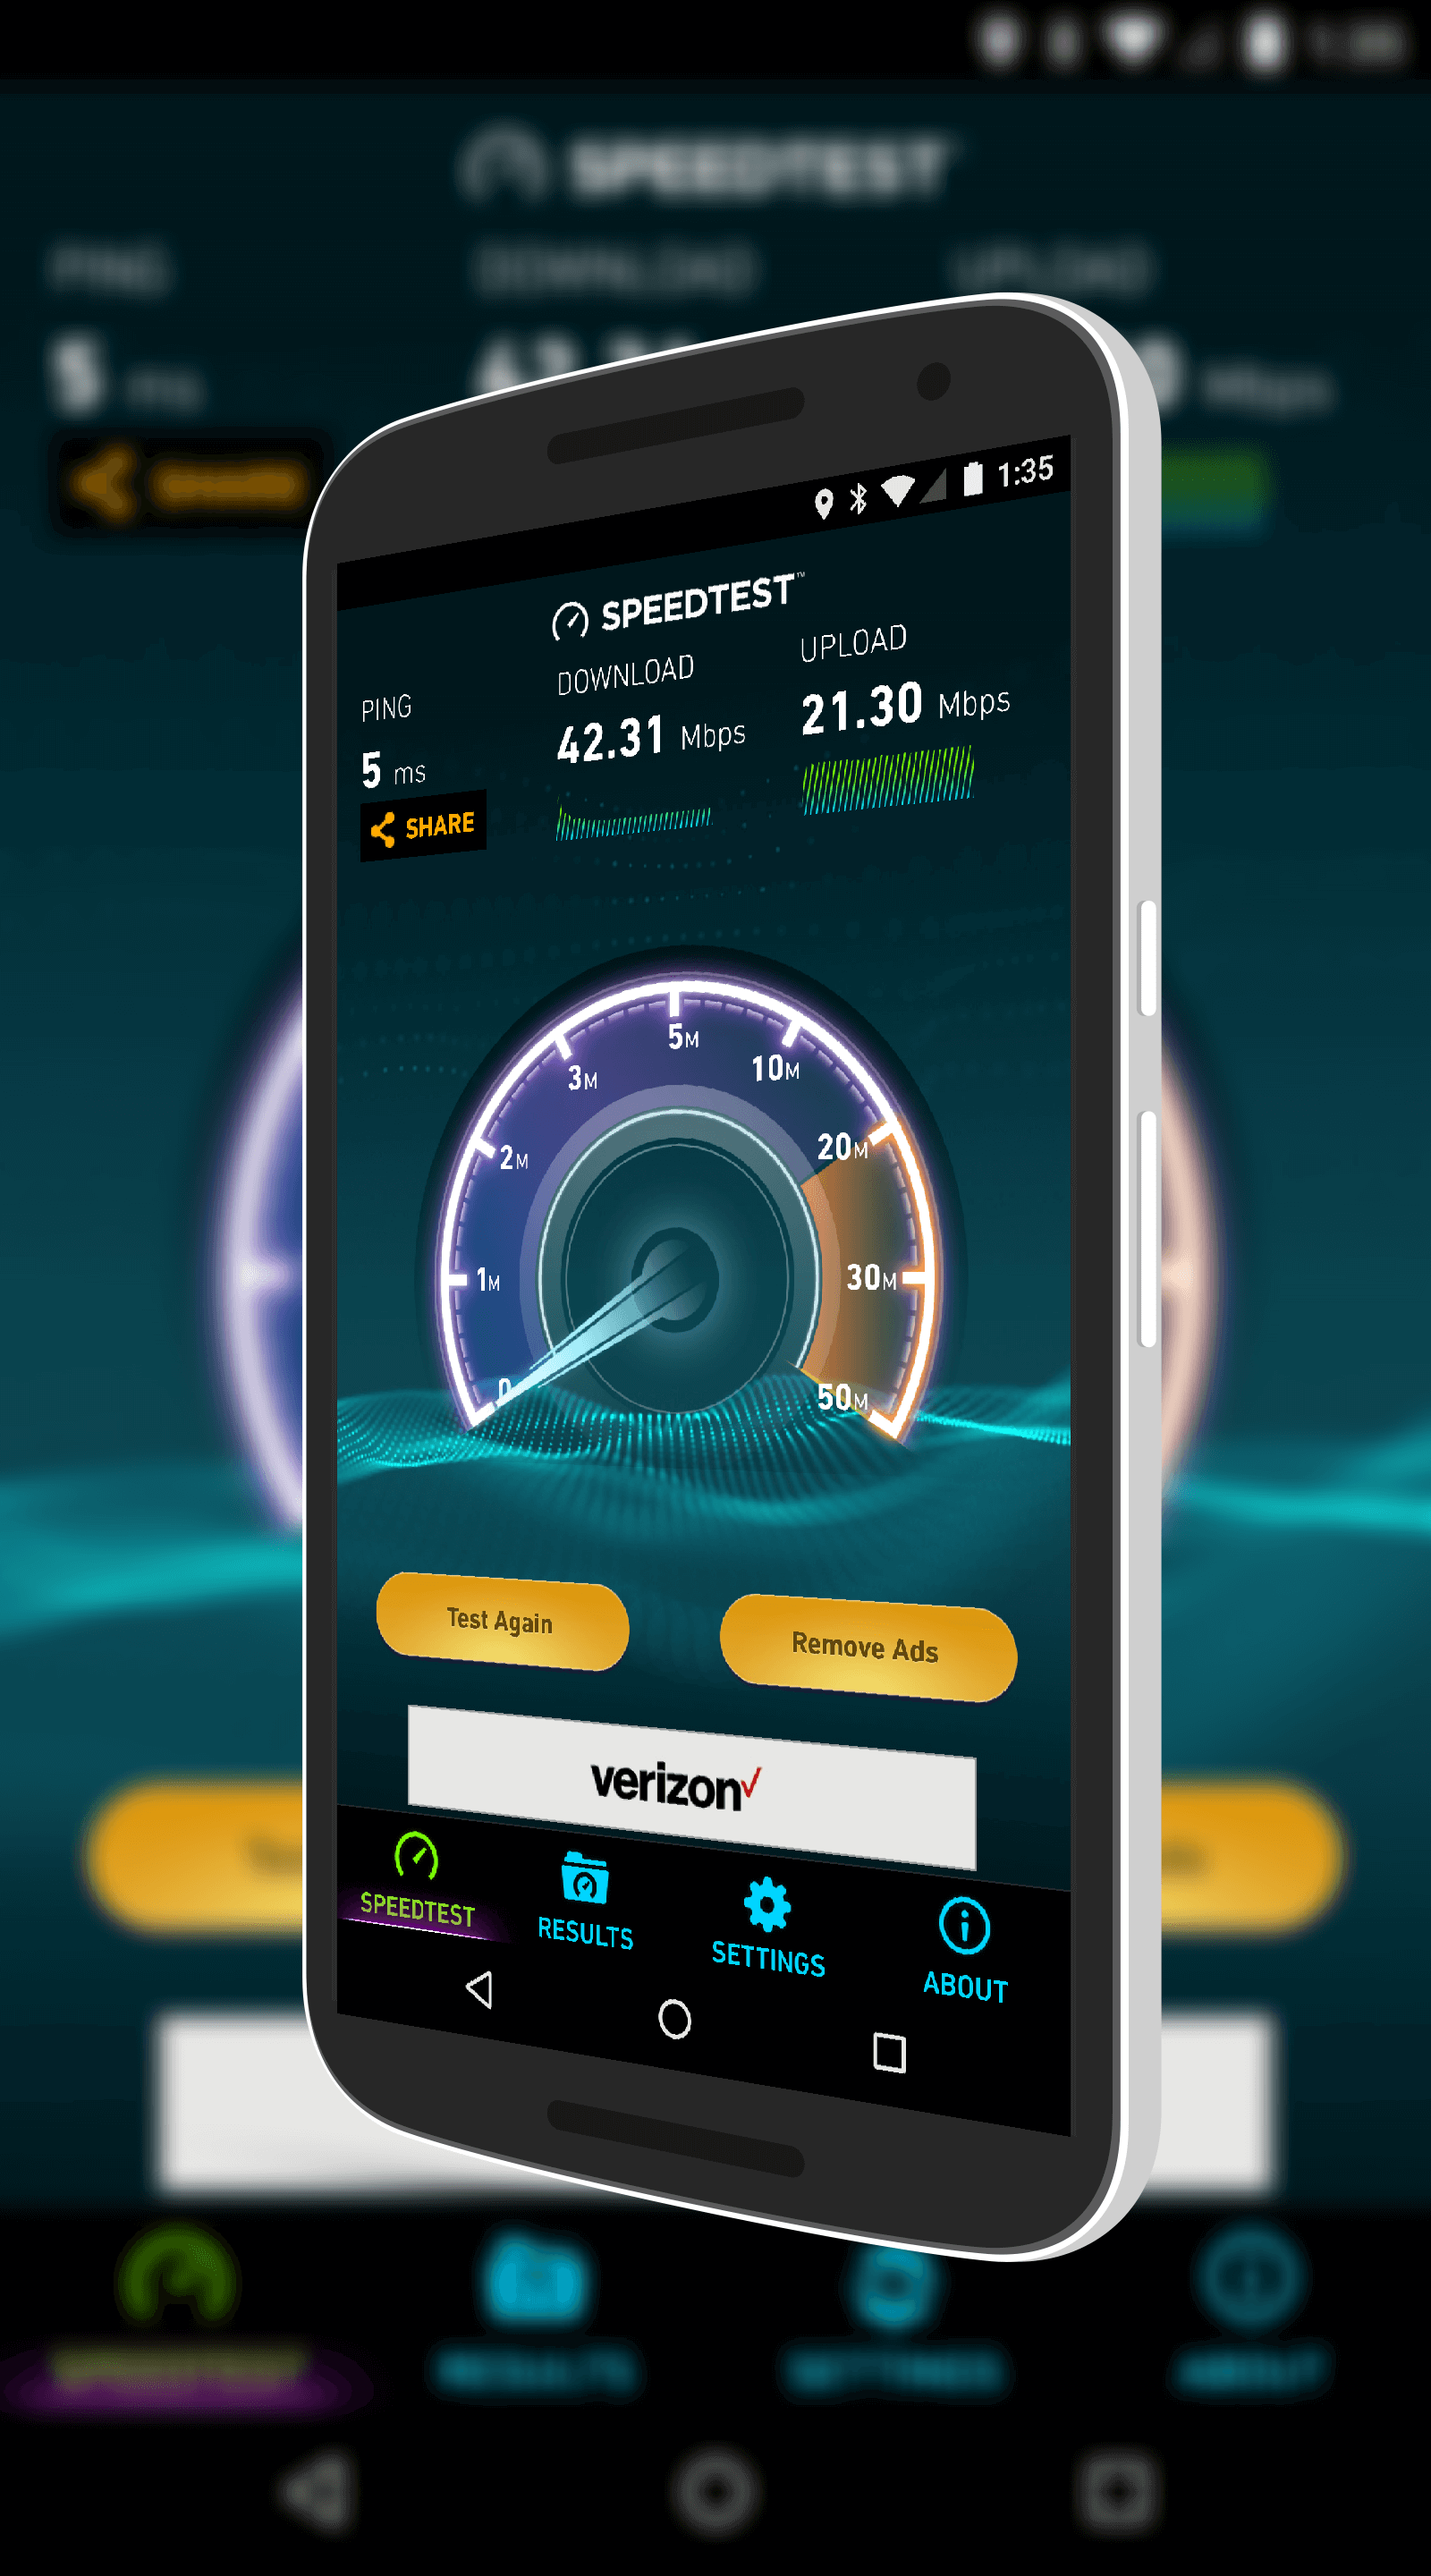
SpeedTest Network Test Results
One of the best features of the OnHub app is the ability to give a particular device network priority over another. For example, if you are in the middle of a Walking Dead binge on your Chromecast, you can tap on your Chromecast in the device listing and give it up to 4 hours of priority over other devices to assure you don’t have any buffering. Essentially what this does is tell your OnHub device that any traffic to and from your Chromecast is the most important thing and it gets dealt with first and fastest before everything else. This is simple QoS (Quality of Service) and it actually works really well. In my testing for this review, I streamed an episode of the Walking Dead without setting the priority and then re-watched with the priority set. In both cases I was home alone with only my PC, printer, Nexus 6 and Nexus 7 on the network sitting idle. Without priority I noticed that the Google Movie & TV app took a few more seconds to initially buffer the stream over when it was prioritized and there were a few instances were I saw pixelization of the image. With priority set, I did not see this at all and it was smooth, crisp watching all the way through.
For my second test, I streamed Orange is the New Black from Netflix under the same network circumstances, first without priority for my Chromecast and the second with priority set. The buffer at the start of the stream was more pronounced without priority, even more so than I saw with the Google Movie & TV app, and again, I noted pixelization. I did encounter pixelization when priority was set as well on Netflix but it
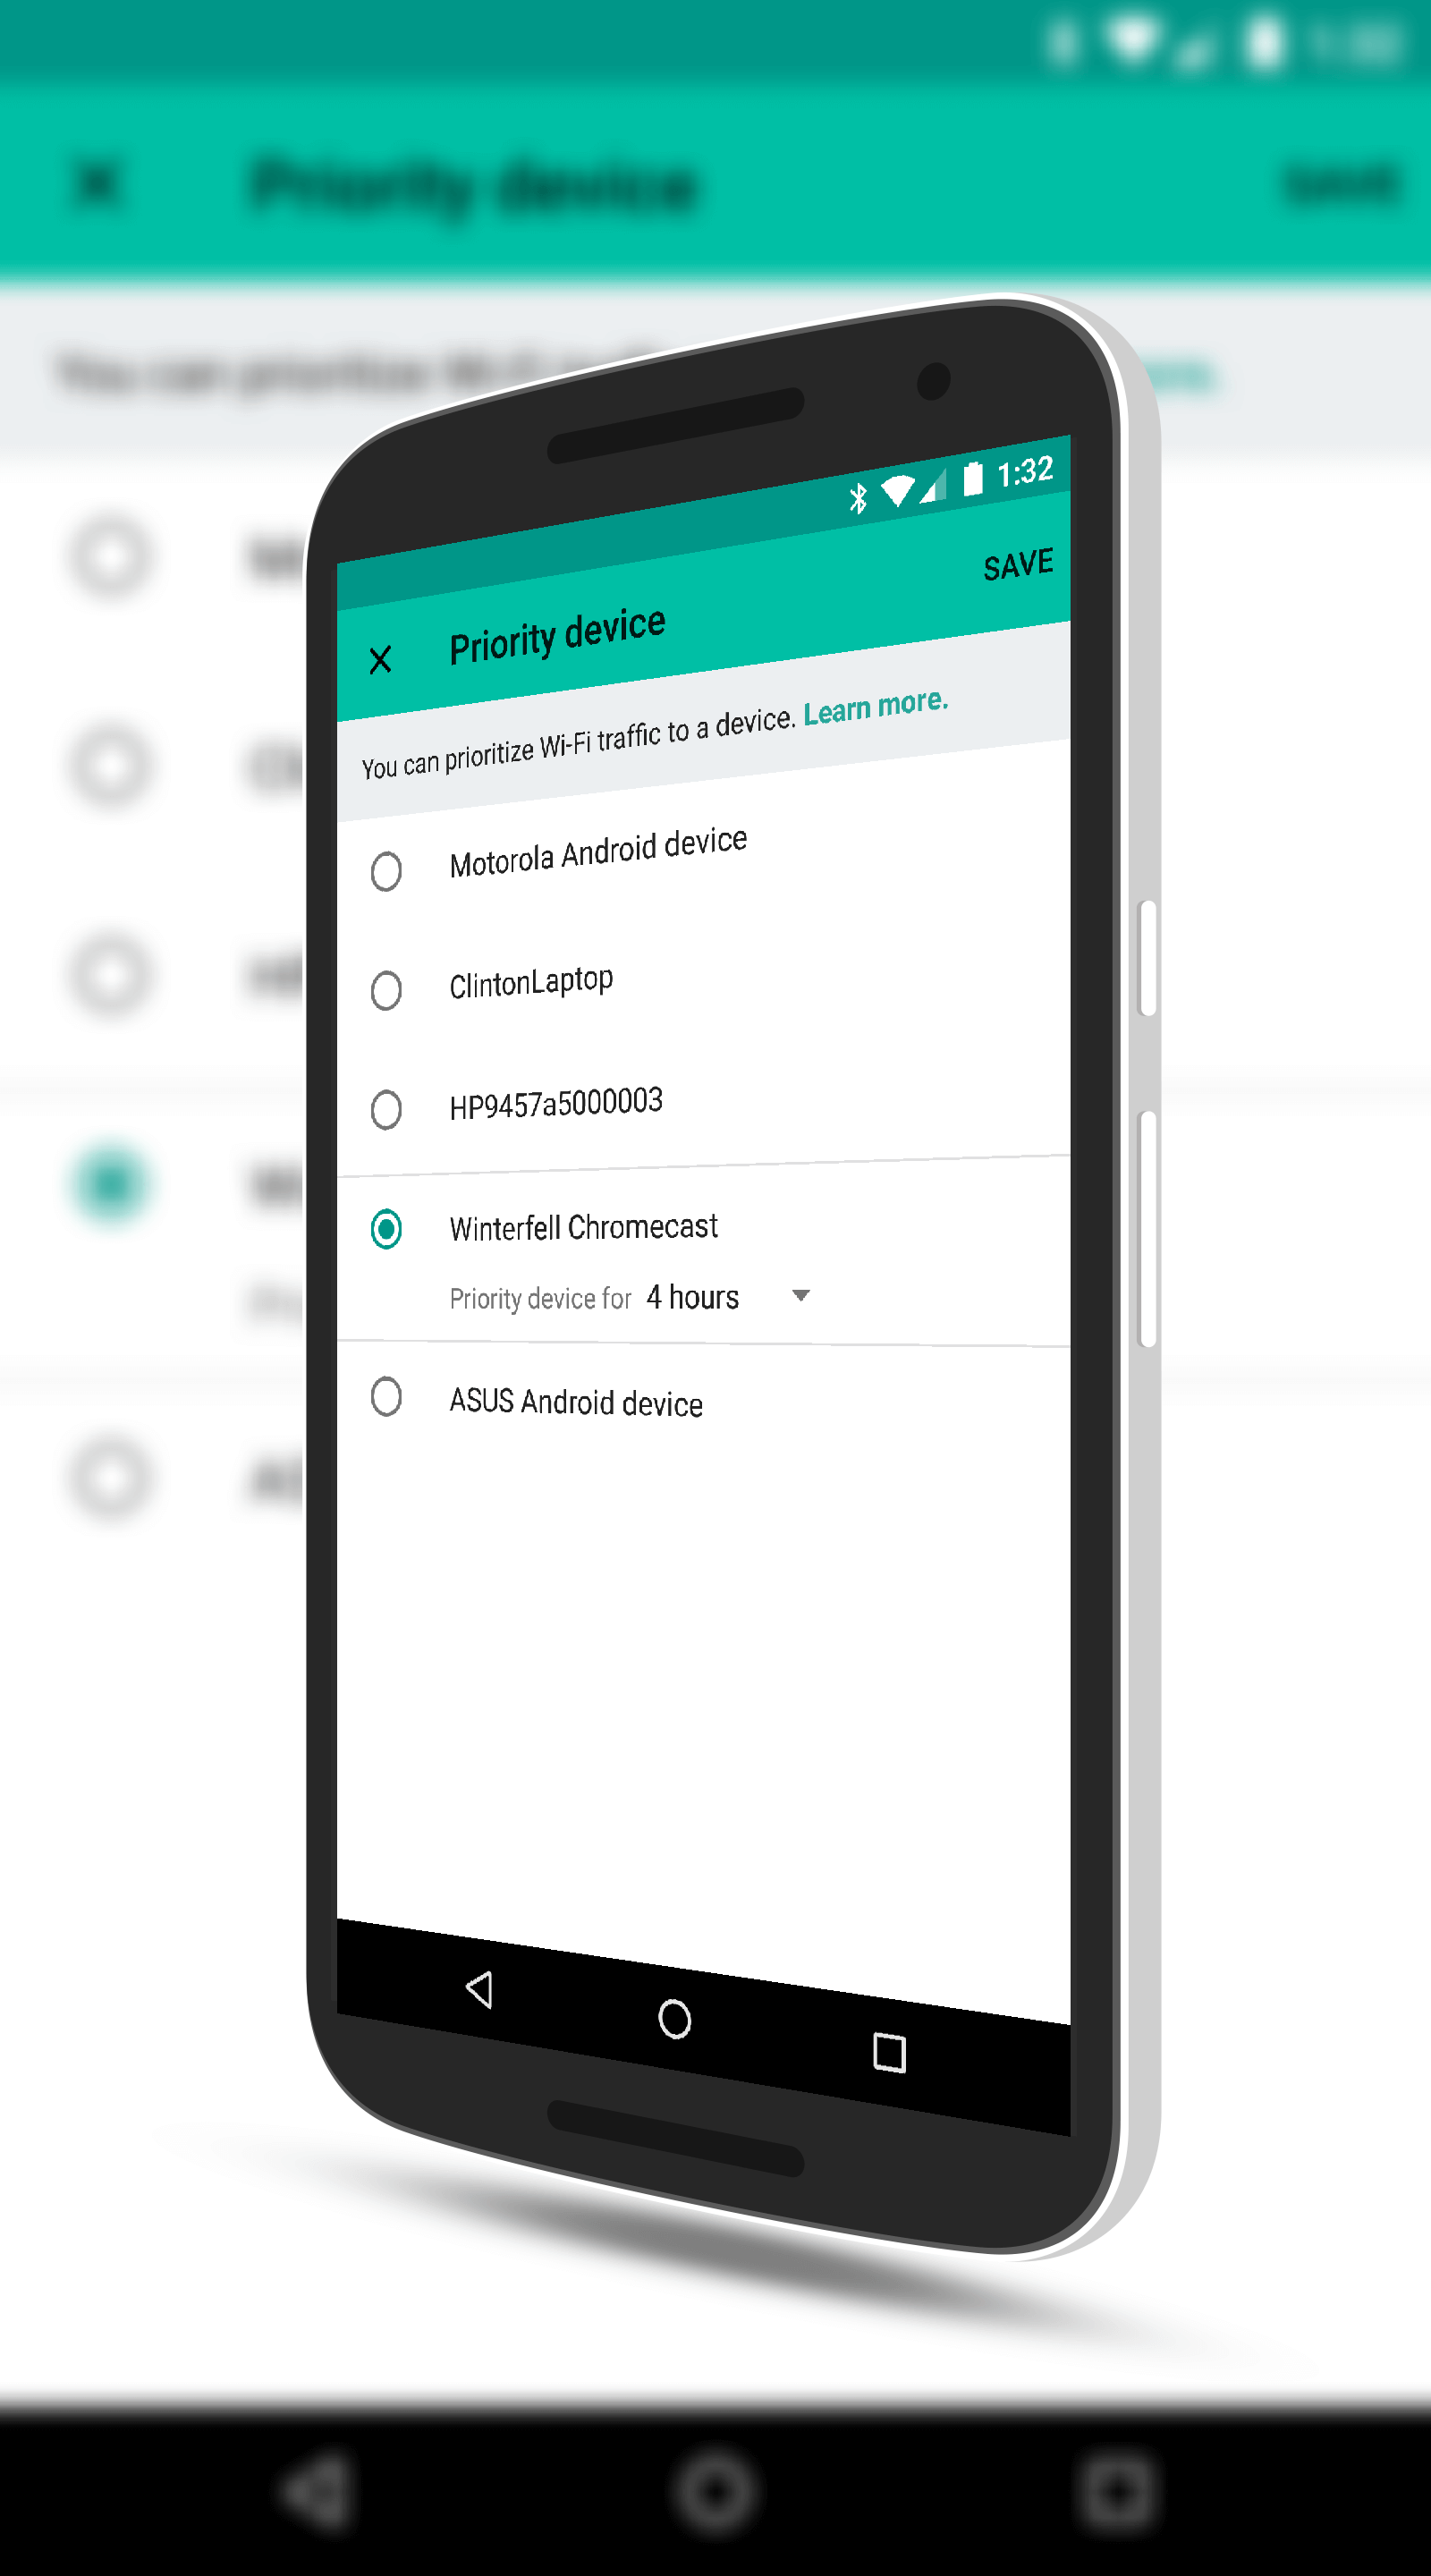
Google OnHub Device Priority Settings
wasn’t as often or as long.
In both test, regardless of the priority setting, I never experienced buffering mid-episode but to be fair, I was on a pretty quiet network for these tests.
The network test results withstanding, I have found the OnHub app to be easy to use and it provides a surprising amount of information. I know some power users won’t like the fact that everything configuration wise is driven from the app but for the target audience of this device, it works great and makes what is often a complex and painful challenge of setting up Wi-Fi in your home easy.
Google OnHub Network Performance
In my using of this device I have been exceptionally pleased with the network performance. It has been very consistent across all of my devices and the dual broadcasting of 2.5 GHz and 5 GHz along with the network congestion detection have been outstanding. I have had far fewer issues with connections and throughput on the OnHub than I did with my Apple Airport Extreme.
As I said earlier, I live in a high rise apartment building and at any given time, I can see 12 Wi-Fi networks at 2.5 GHz and another four at 5 GHz. Most of these are set up on the channels that the ISP setup on them during installation (which in my my building is either Comcast or CenturyLink) or they are set to automatic channel selection. That however doesn’t kick into play until the router is rebooted so what happens is you end up with a lot of networks on the same channel which creates congestion. Couple that with the other radio wave generating things in your house like a microwave, wireless home phone, security systems and other things, you have a lot of radio frequencies flying about, bumping into each other and that’s before we even get to the concrete and steel construction of my building.
You get my point: There are a lot of things that cause Wi-Fi congestion but since enabling the OnHub, I have had a far more consistent wireless experience that is fast and reliable because it will change frequencies as it needs to do so. It is seamless and just works and I really couldn’t be more pleased.
Google OnHub and Privacy
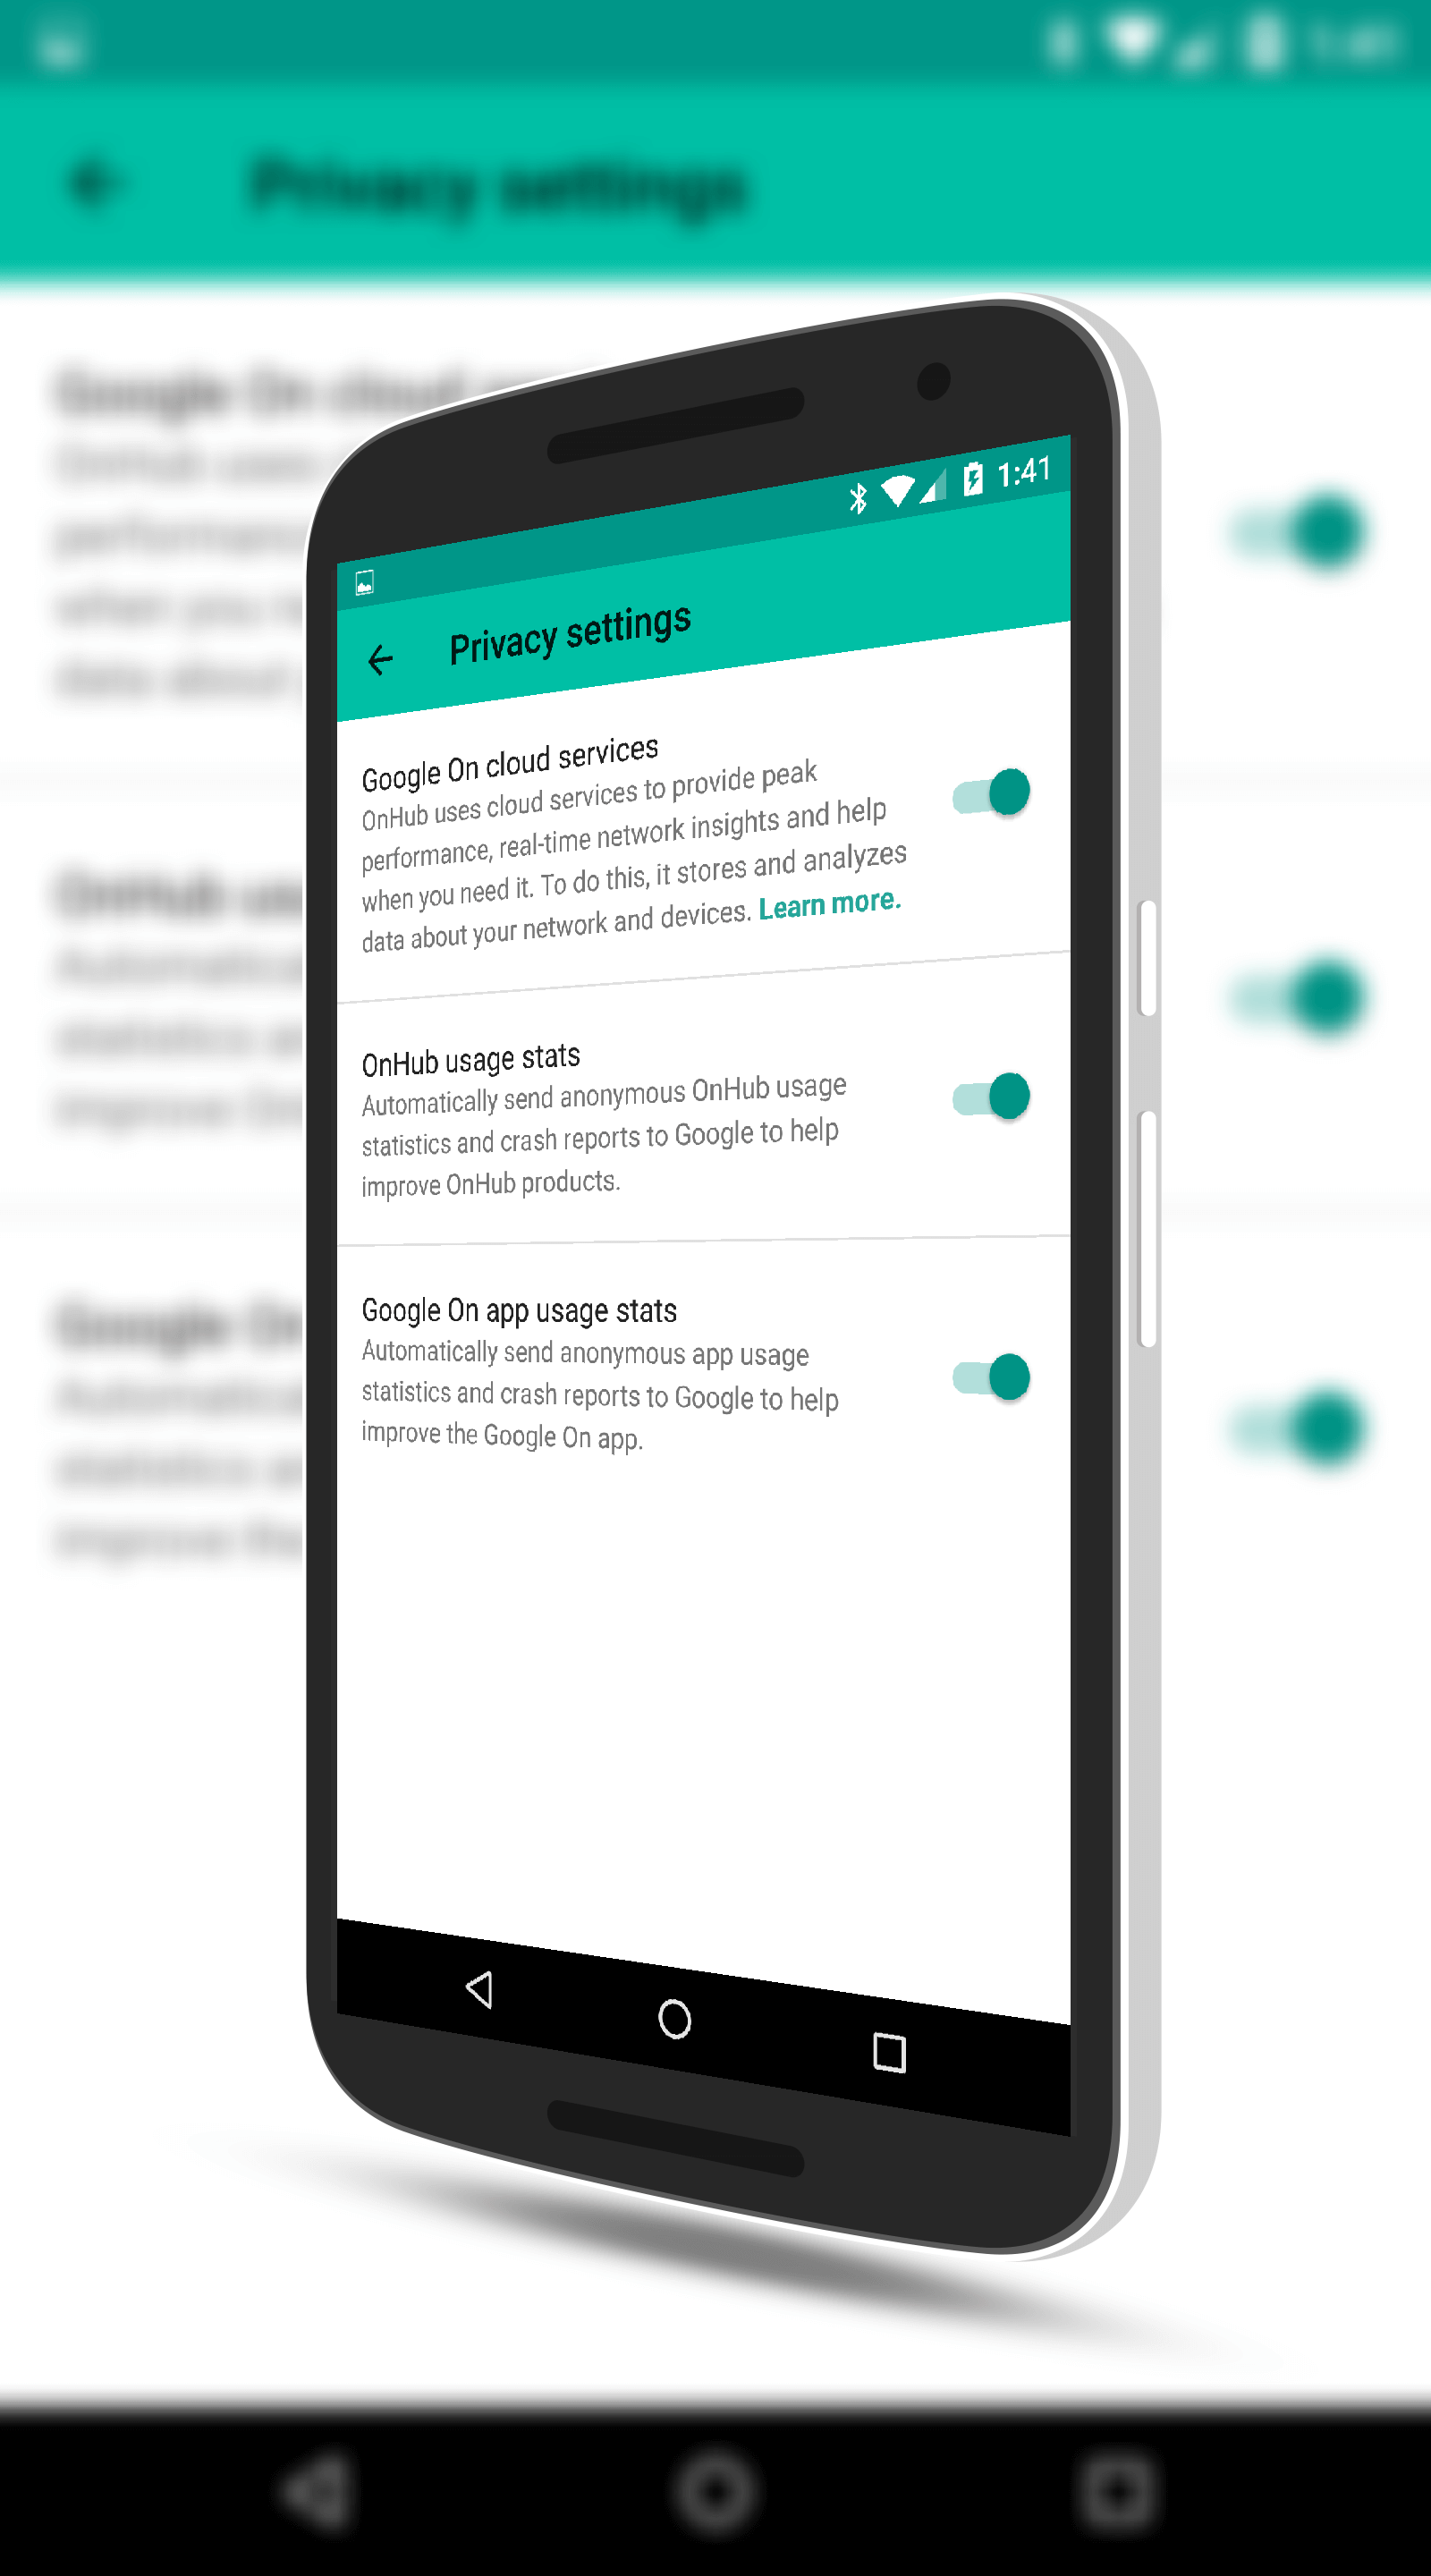
Google OnHub Privacy Settings
The joke in my house between me and my wife, and I doubt we are unique, is “Google knows everything”. Even though she is on an iPhone, we both use Google services at home and on our mobile devices. That means Google knows a lot about us and our habits but ultimately we are in control of what we allow access to by managing in through our Google Account Dashboard. When Google
announced the OnHub, the almost immediate reaction I saw online was that Google could now monitor your web browsing habits, down to the sites you visit. The short answer to this is no, they are not doing this type of tracking.
Google has painstakingly outlined exactly what they are tracking with OnHub and have gone so far as to put a page in the OnHub app that allows you to select what Google can or cannot track and have a lengthy web page outline OnHub and privacy.
The information your OnHub and the Google On app collect helps us deliver the best Wi-Fi experience possible.Importantly, the Google On app and your OnHub do not track the websites you visit or collect the content of any traffic on your network. However, OnHub does collect data such as Wi-Fi channel, signal strength, and device types that are relevant to optimize your Wi-Fi performance. Google policies and terms of services apply as normal to any Google services you use (like Gmail or Google search), whether you’re using them on an OnHub network or not.
The site goes on to explain in detail what the settings inside the OnHub app do and give access to Google to see. They even have a sub-section outlining how DNS is treated.
The bottom line is that Google is being very clear about what they are and are not capturing and collecting.
Where is Google Going With OnHub?
The biggest challenge facing the Google OnHub is the price point for what you are getting – today. It is a wireless access point, a really good one actually, but it is pretty locked down at this point that power users will not like. It has an impressive amount of hardware in it and it clearly is being positioned for Google’s smart home functionality play. That’s great and fine but the question and really the bet that anyone who buys this device today is making is if Google will see that vision out. The Google highway is littered with carcasses of projects that got a lot of hoopla at first but died on the vine later. Google Glass is a great example (although it’s apparently making a comeback) or there were others that were or continue to be starved for attention. Google Hangouts comes to mind.
If Google OnHub gets the attention it deserves from the company and serves as a launching point for the companies home initiatives, then this will work out to be a great investment in a couple of years. If they don’t however, you have a really expensive access point that has a massive amount of unrealized potential. Personally, I’ve made the bet that it will be the former and not the latter. Smart homes and IoT is rapidly growing and there is nothing on the horizon to suggest that will stop any time soon. Google clearly has the ability to add features and functionality to OnHub at will which could make a truly connected home that leverages their technology easy to configure, adapt and use.
Conclusion & Recommendation
Usually when I do a review, I either recommend the product or app or not. In this case, I’m doing both.
If you are a power user who likes a lot of knobs to turn and tinkering with traffic shaping, network DHCP ranges and the like, the Google OnHub is not the device for you.
If you are a home user, even one with a fair amount of network setup knowledge, who wants a device that is easy to setup, configure and control, this is a device for you. Yes it is expensive, no doubt, and yes you are making a calculated bet that Google will up the functionality of the OnHub over time as smart home and IoT becomes more ubiquitous. But even with that in mind, for a home user who just wants worry free Wi-Fi that provides fast, consistent performance, I have no problem recommending this device.
The Google OnHub series has two models: The TP-Link built device which I reviewed at $199.99 and the Asus built unit which is slightly more at $219.99. What’s the difference? Not much really other than you can set priority for a device on the Asus model by waving your hand over the top of it. For more information, visit the Google OnHub site.
The OnHub performs very well but still a lot of holes in it.
Firmware updates have been made although nothing earth shattering.
Still unable to name a device, still not parental controls and for a router being targeted for the family, this makes no sense.
Also numerous issues with the Network check on the app, number reporting is not correct.
For $200, some people expect a lot more but nothing has happened at this point.