There are times when the only connectivity to the Internet you have is your data connection on your Windows Phone at an airport, hotel or while in a taxi. With high speed 3G and 4G coverage throughout most major cities and countries in the world, being able to leverage that connection from your Windows PC or tablet can be important when you are in the back of a taxi making that last minute change to a PowerPoint presentation (which you would need to do from a PC or tablet given how poor the Office experience is for Windows Phone – but I digress). In this How To I will show you how to quickly and easily configure the Internet Sharing feature of your Windows Phone so it can be that mobile hotspot for your other devices.
Two things to keep in mind about this How To. First, it is made with the assumption that you have this feature from your carrier available and enabled. Here in the US, I’m on AT&T and tethering as they like to call it is by default enabled and does not cost any extra for me to use. You will need to check with you mobile provider to see if that is the case for your account. If you do not have it included in your account and you do Internet Sharing, you could rack up some serious charges so check it out before you set this up. Secondly, you will use a significant more amount of data if you have Internet Sharing enabled and are using your Windows Phone to connect two or three devices at once. Make sure you have enough data to cover your needs on your monthly account.
To enable Internet Sharing, go to Settings on your Windows Phone and scroll down to Internet Sharing. By default this will be turned off and you will see your device’s name and the
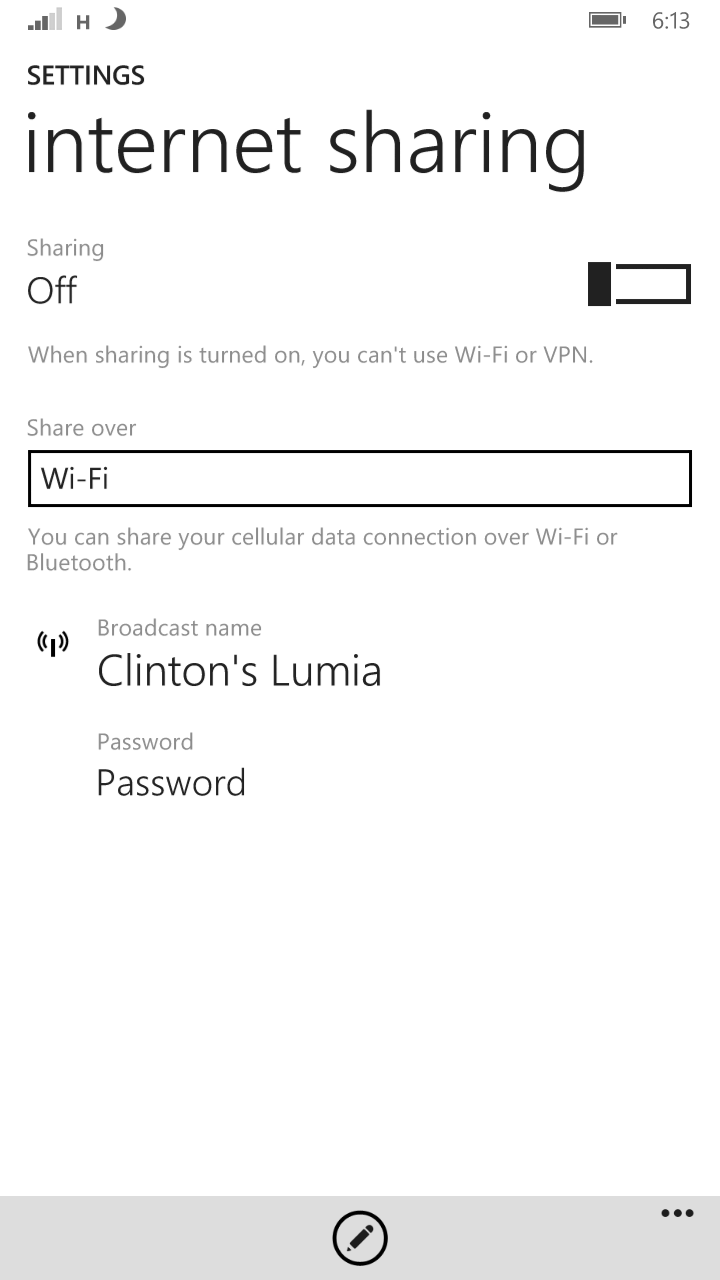
Enable Internet Sharing on Windows Phone
default password. Both of these can be edited by tapping the pencil icon at the bottom of the screen. I recommend naming your phone to something more familiar to you as this will act as the SSID for your phone when you search for it from your other devices. I named my “Clinton’s Lumia” and set the password to something different. Use good password practices and have the password contain a CAPITAL letter, a special character *&!@ and a number 1234. Once you have the device name and password set, tap Save.
Internet Sharing Enabled Icon
Now turn on Internet Sharing with the slider. You will note that a new icon appears at the top of your Windows Phone’s display next to your mobile data signal indicator. This antenna icon is a visual indicator that you have Internet Sharing enabled. You will also note that your WiFi connection has dropped if you had it enabled. This is because you cannot share a WiFi connection using this feature, only the mobile data from your Windows Phone. At this point your Windows Phone is effectively broadcasting your SSID (the name of your device) to be discovered and connected to by your Windows PC or tablet (or any other device for that matter).
From your Windows PC or tablet, open the Charms menu (swipe left on your screen or touchpad in Windows 8.1) and go to Settings. Tap the Network icon to see the list of networks that are available to you. You should see your Windows Phone being listed as one of the options. Tap it, enter your password and you are now connected to your Windows Phone as a mobile hotspot. How you do this on non-Windows devices will vary but the key is finding your phone’s broadcasted name so you can connect to it.
Once connected, go back to your Windows Phone and go back to Settings>Internet Sharing. There you will see 1 device connected to your phone as sharing the data connection. In my case, on my Lumia 1320, I can have up to 8 devices connected to it for data sharing but remember that for each device connected, every device will have a slower throughput on the connection.
Alternatively, you can configure your Action Center on your Windows Phone to show Internet Sharing as an option. To do this, go to Settings then
Action Center Icon for Internet Sharing
Notifications + Actions. You will see here the list of items that are shown in the top menu of the Action Center. Tap on one of them to add the Internet Sharing icon to the menu. Doing this will allow you at a glance to see how many devices you have sharing your connection with a simple swipe down on your Windows Phone start screen. Equally as important, doing this will allow you to enable or disable Internet Sharing with one tap in the Action Center instead of having to navigate in the Settings menu each time you want to use it.
For more How To’s for Windows Phone, be sure to check out my How To’s for Windows Phone page. For How To’s for Windows, you can find those here on the site.